
2021-02-07
Securing REST APIs Using OAuth 2.0 + Spring Security 5 + Auth 0
Step by step instructions to secure REST API using OAuth 2.0 protocol + Spring Security 5 + Auth0 (Identity as a Service - Platform)
This article use Auth0 (IDaaS Platform) to secure REST APIs. You may use Keyclock or Okta or any other OAuth 2.0 Protcol complaint authorization server.
For different OAuth 2.0 Protcol complaint authorization server, configuration screen may be different. But under the hood, they all use OAuth 2.0.
Following are the list of steps that we will be covering in this article
- Auth0 Configuration to secure a REST API
- Create a Spring Boot application with required dependencies
- Create and Secure REST APIs
- Test REST API with and without Security
Note: In this article, words ‘OAuth 2.0’ and ‘Auth0’ is used a lot. OAuth 2.0 is the protocol to secure REST API and Auth0 is an Identity as a Service platform. Please make sure you don’t get confused while reading.
Note: If you want to follow along this article, you may need to signup for a free account at Auth0.
Step 1. Auth0 Configuration to Secure REST API
In Auth0, there are 2 different types of configuration. You may see under ‘Applications’ side menu, there are 2 sub menu items.
- APIs
- Applications
API - The one that will be called by UI or another API is configured here. Application - The one that calls the API. Here it can be a another API or a Single Page Application or a Native Application.
In order to secure our API (the one that will be called), let us create a API in Auth0. API in Auth0 may correspond to one or more Spring Boot REST APIs.
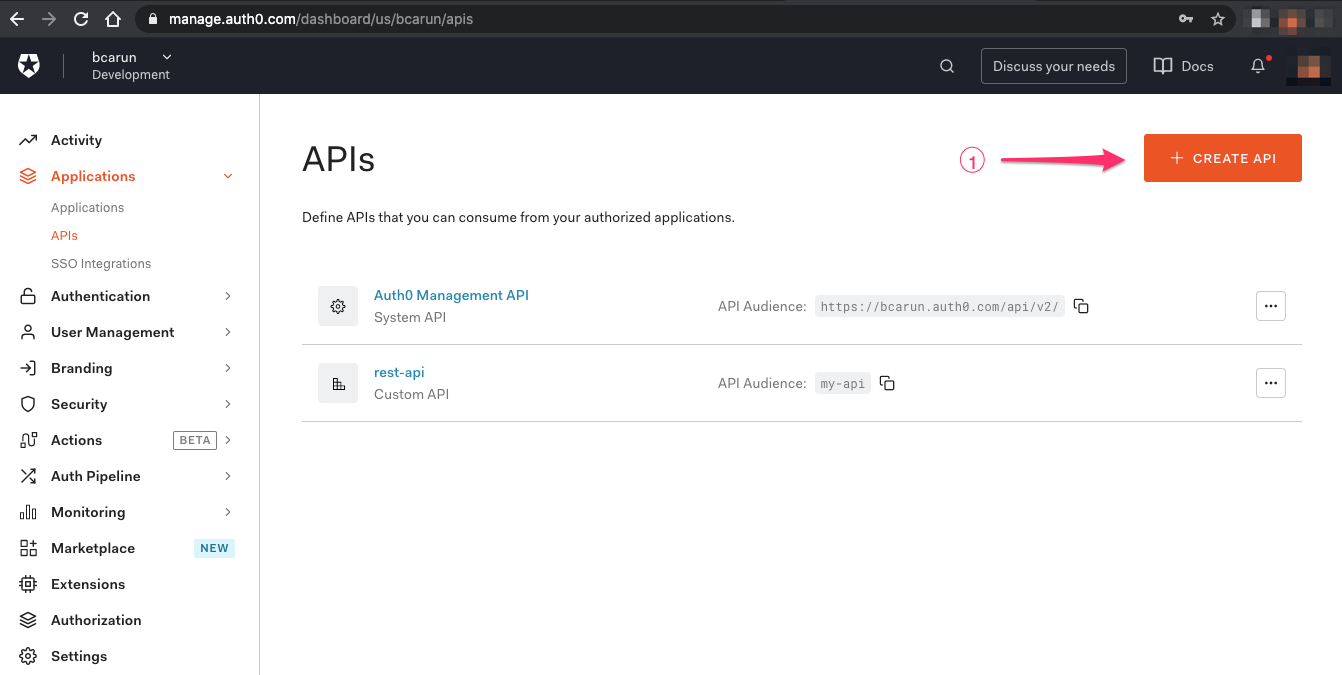
Step 1.1 - Login into Auth 0 and Create Auth0 API Configuration
Login to Auth0 → navigate to left hand side menu and select API → and click Create API ( 1 )
You may create just one Auth0 API to represent multiple Spring Boot APIs assuming each endpoint has different permissions. This will avoid creating 100 different Auth0 API configuration for 100 different Spring Boot APIs, which is harder to maintain. Keep this in mind, don’t worry if you don’t understand it now.
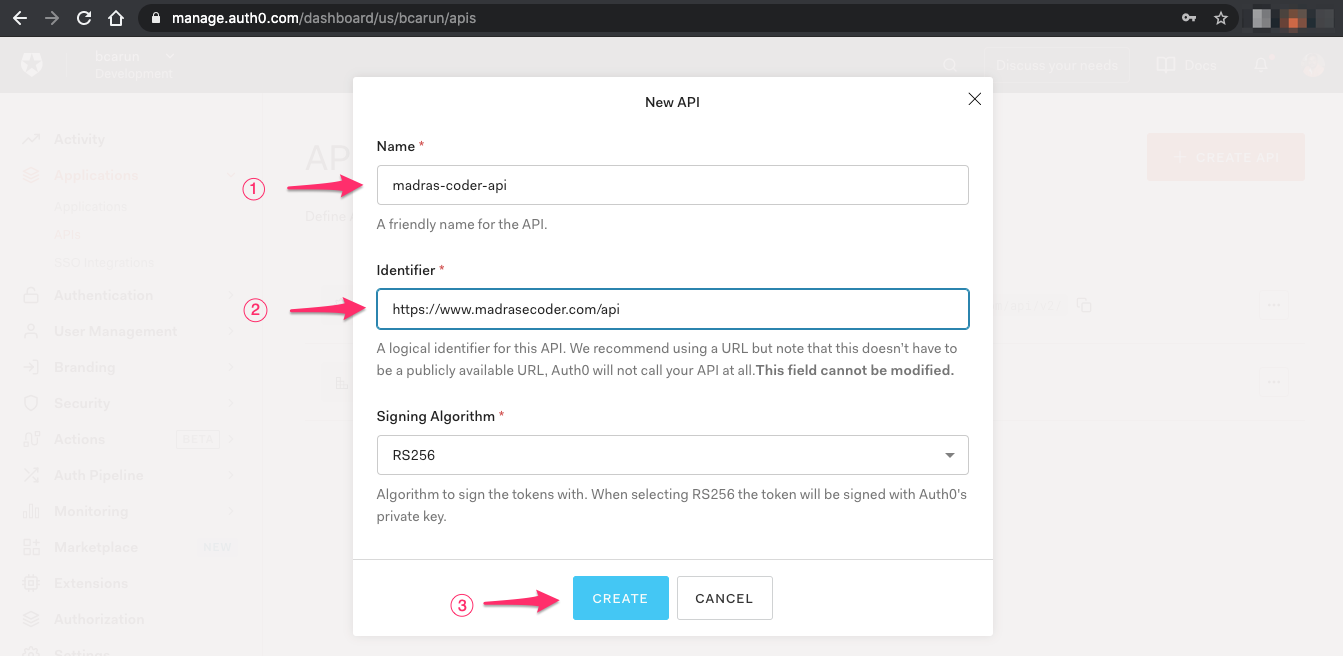
Enter API name ( 1 ) and identifier ( 2 ) and click on Create API ( 3 )
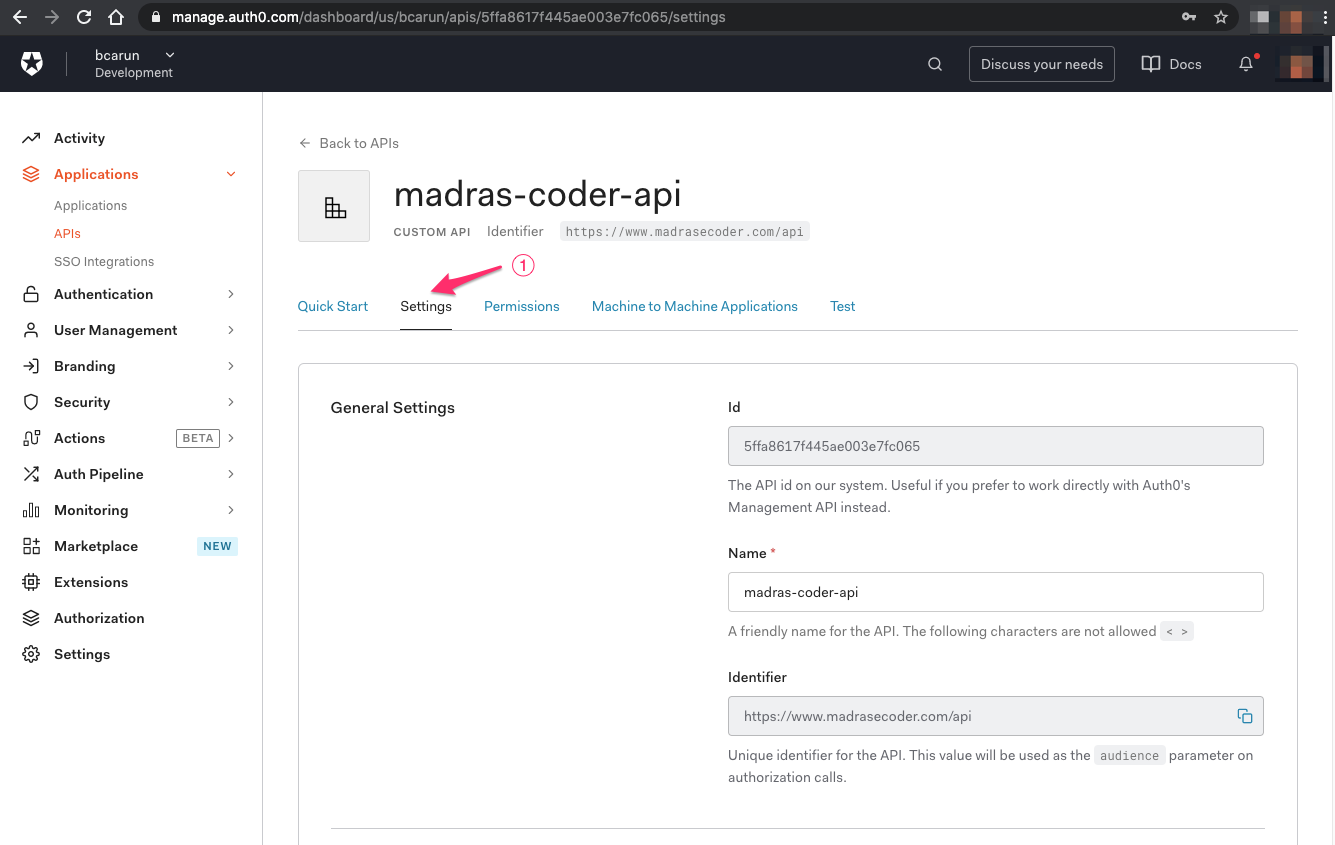
Step 1.2 - Do the necessary Settings for the API Configuration in Auth0
After successful API Configuration, select Settings ( 1 )
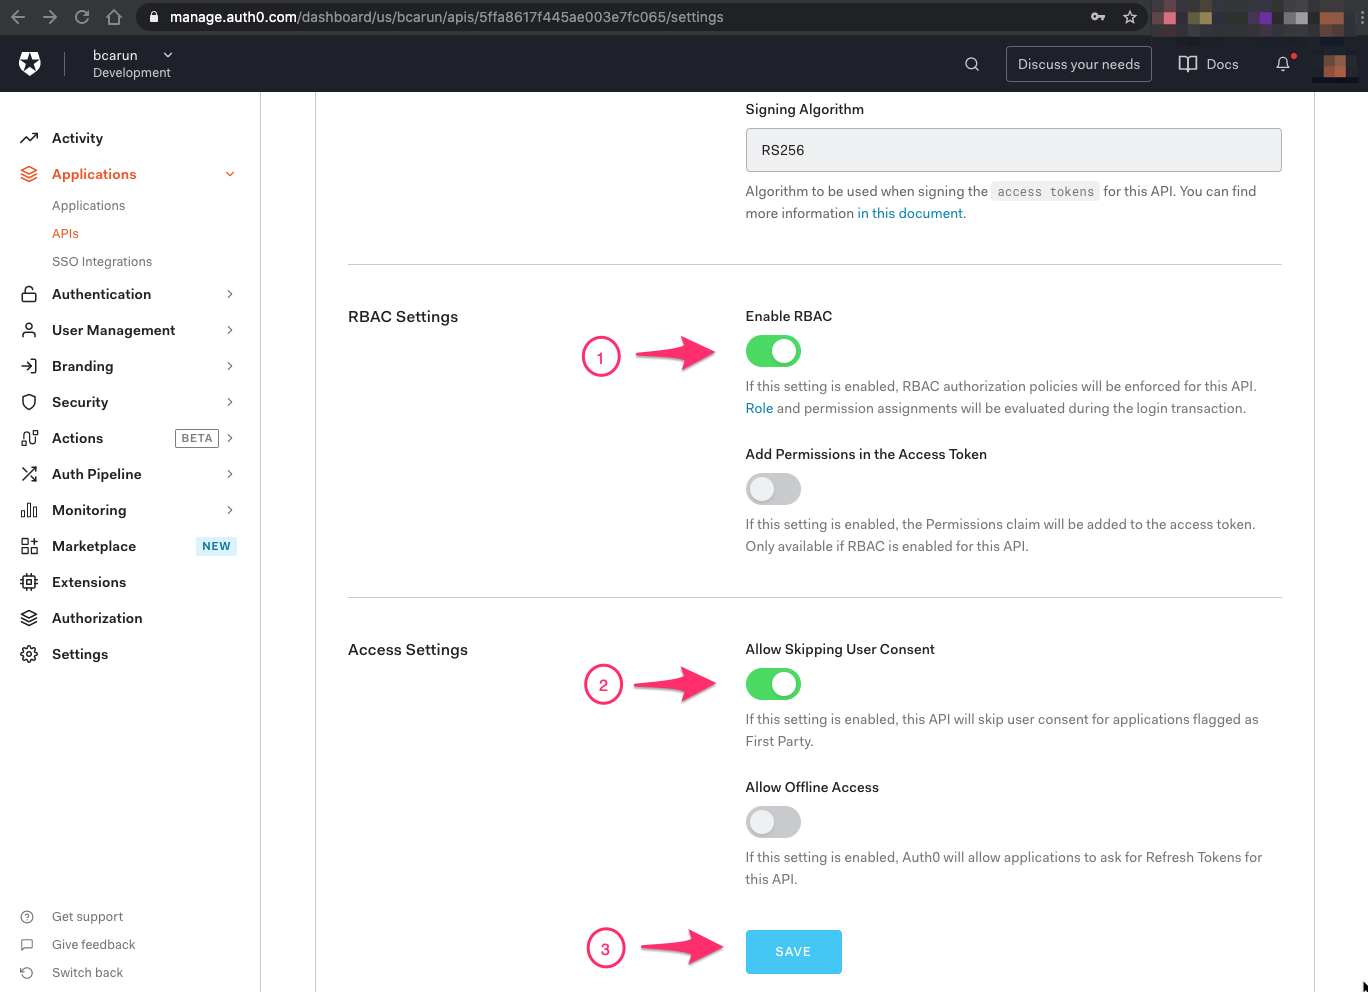
In the Settings, select Enable RBAC ( 1 ), Allow Skipping User Consent ( 2 ) and Save ( 3 )
Step 1.3 - Setup Permissions for API
Select Permissions ( 1 ) → and Add permissions ( 2 ) ( 3 )
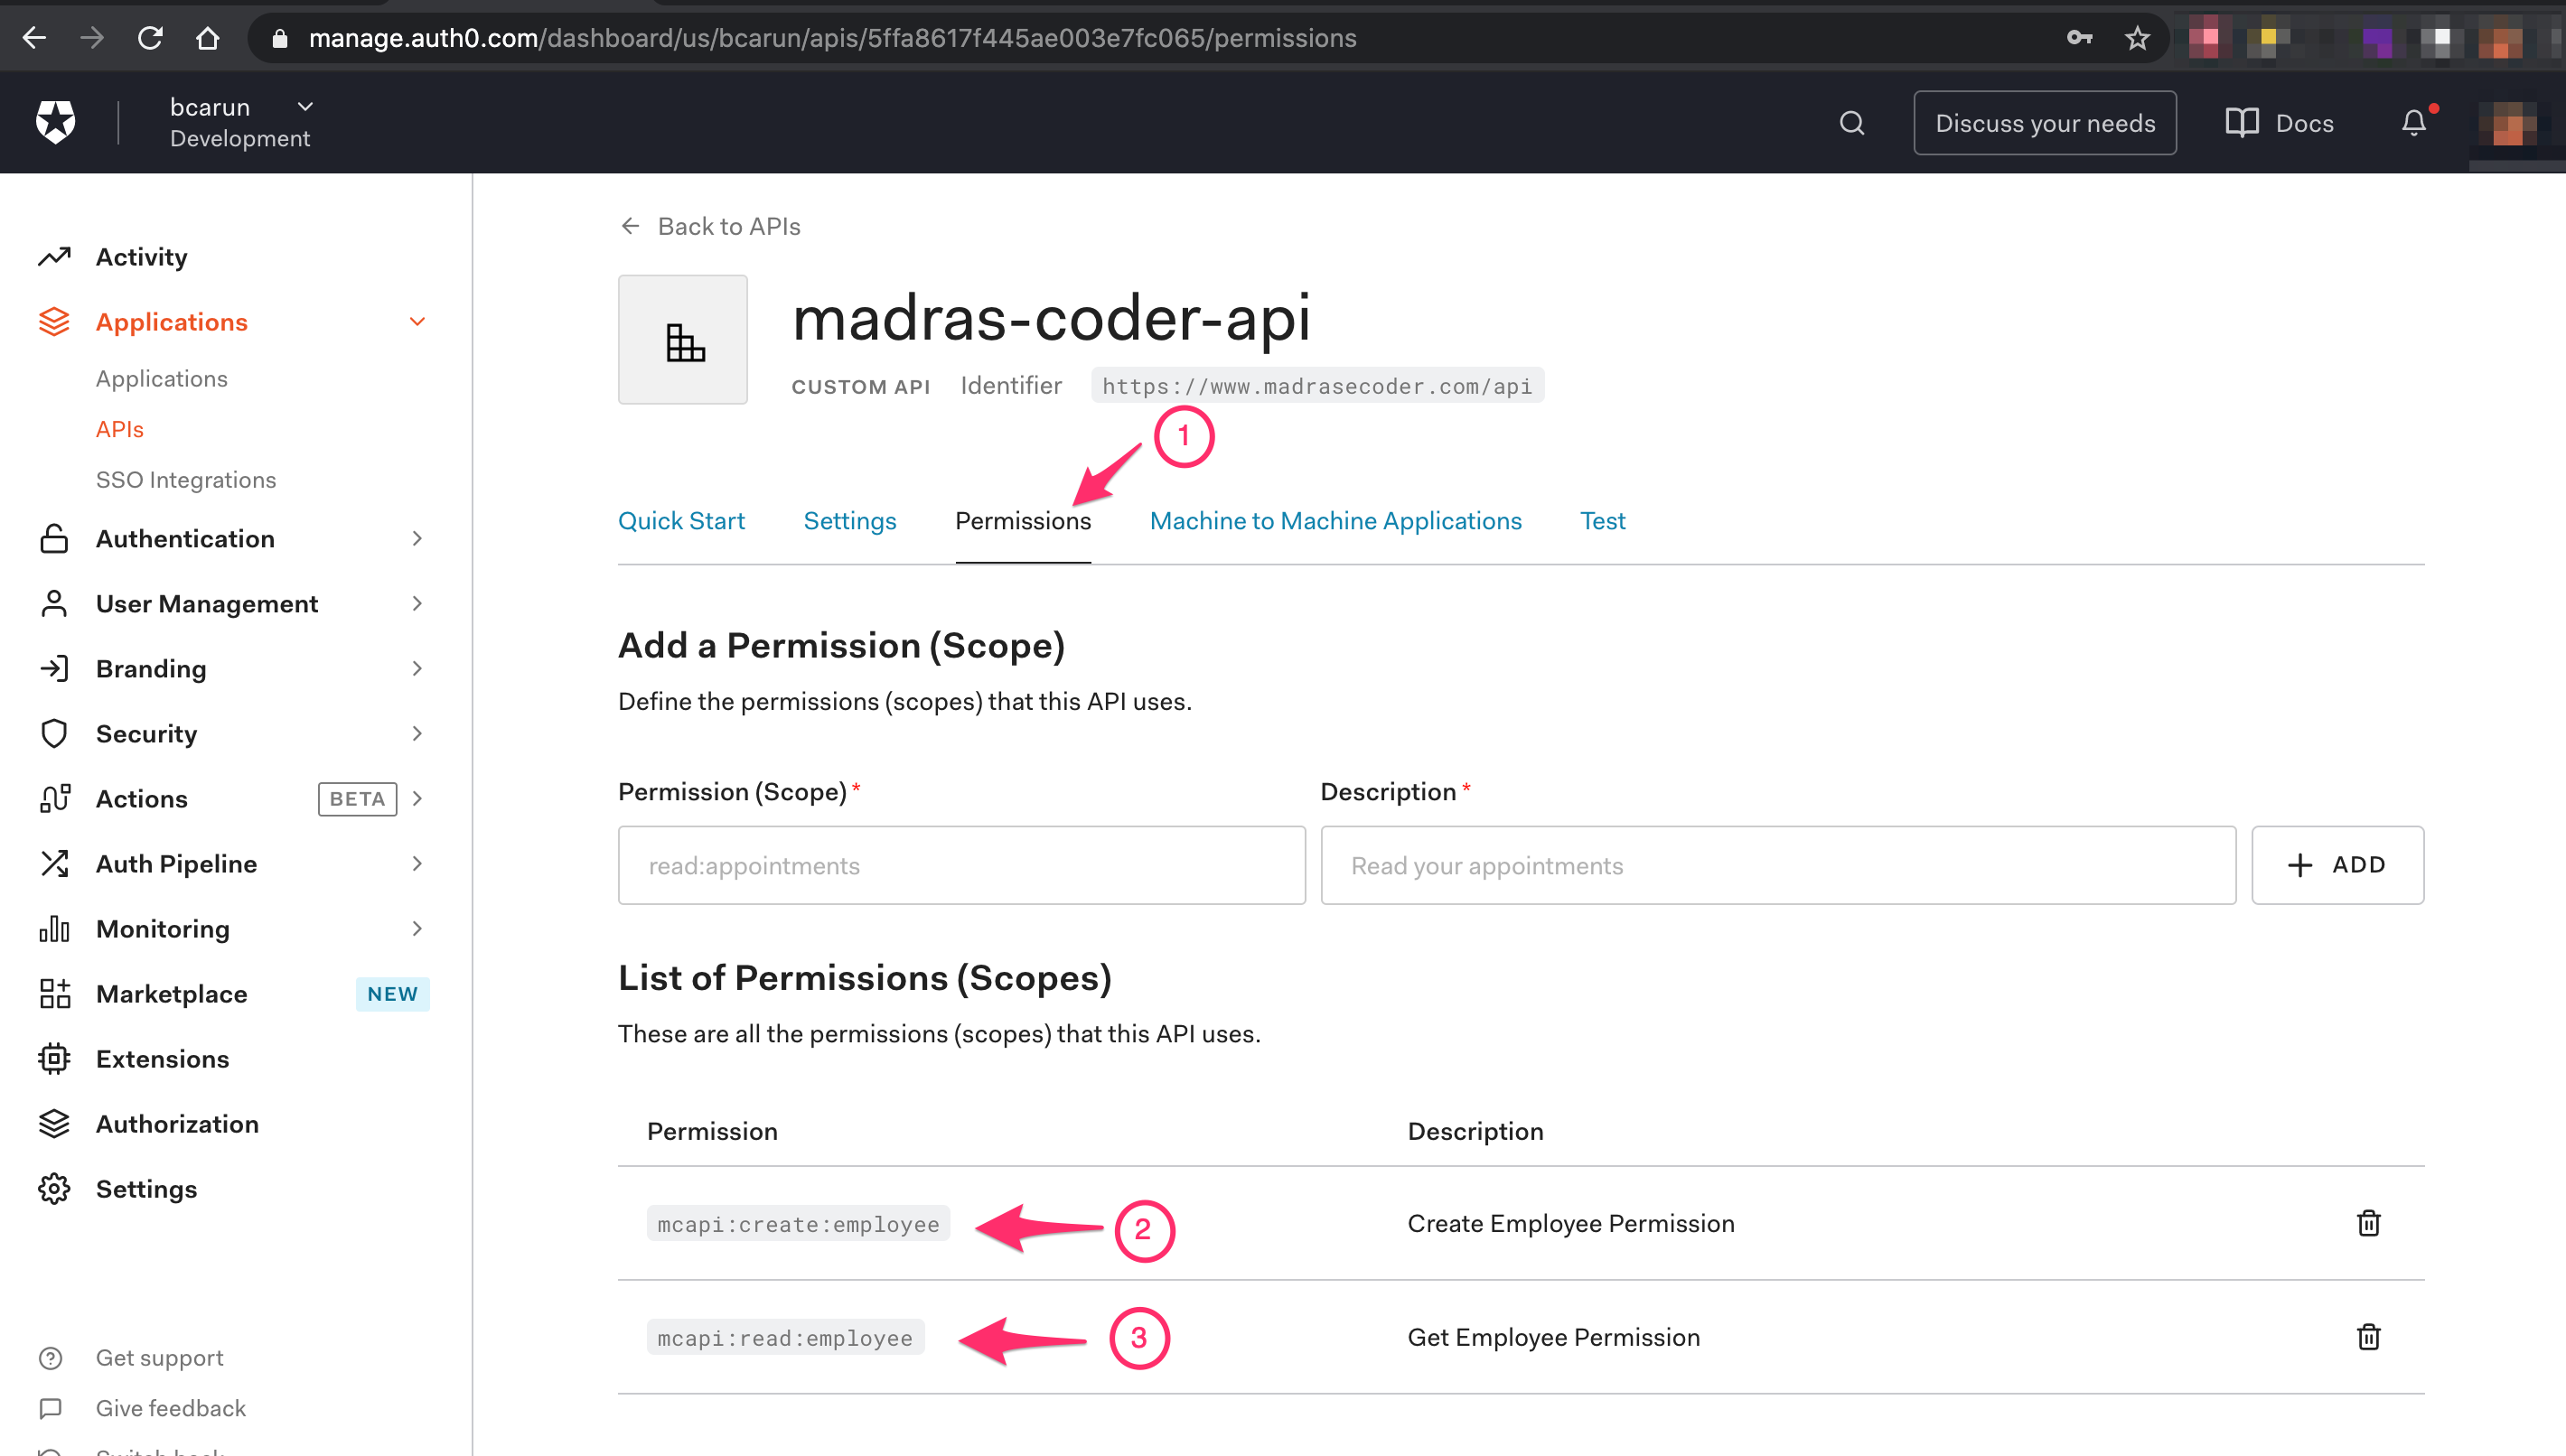
Permission Name Convention
<api-short-name>:<permission-type>:<resource-name>
Note 1: In Auth0, multiple APIs permissions/scopes are consolidated under one claim in JWT. I recommended to come up with a short name for the API and use it as prefix for each permission name to avoid collition.
Note 2: Do not have any space in permissions name. In Auth0 permissions and scope means the same. Each scope is separated by space in JWT ‘scope claim’, having a space in permission/scope name may not work as expected as each split will be considered as a separate scope.
Step 2. Create a Spring Boot Web Application
Now that we have necessary configuration to secure our API in Auth0, let us create a Spring Boot API.
Step 2.1 - Generate Spring Boot Application
You may use Spring Initializr or a maven project with below said dependencies ( 1 ) ( 2 ) to generate a Spring Boot application. We will use this application to configure security and test API.
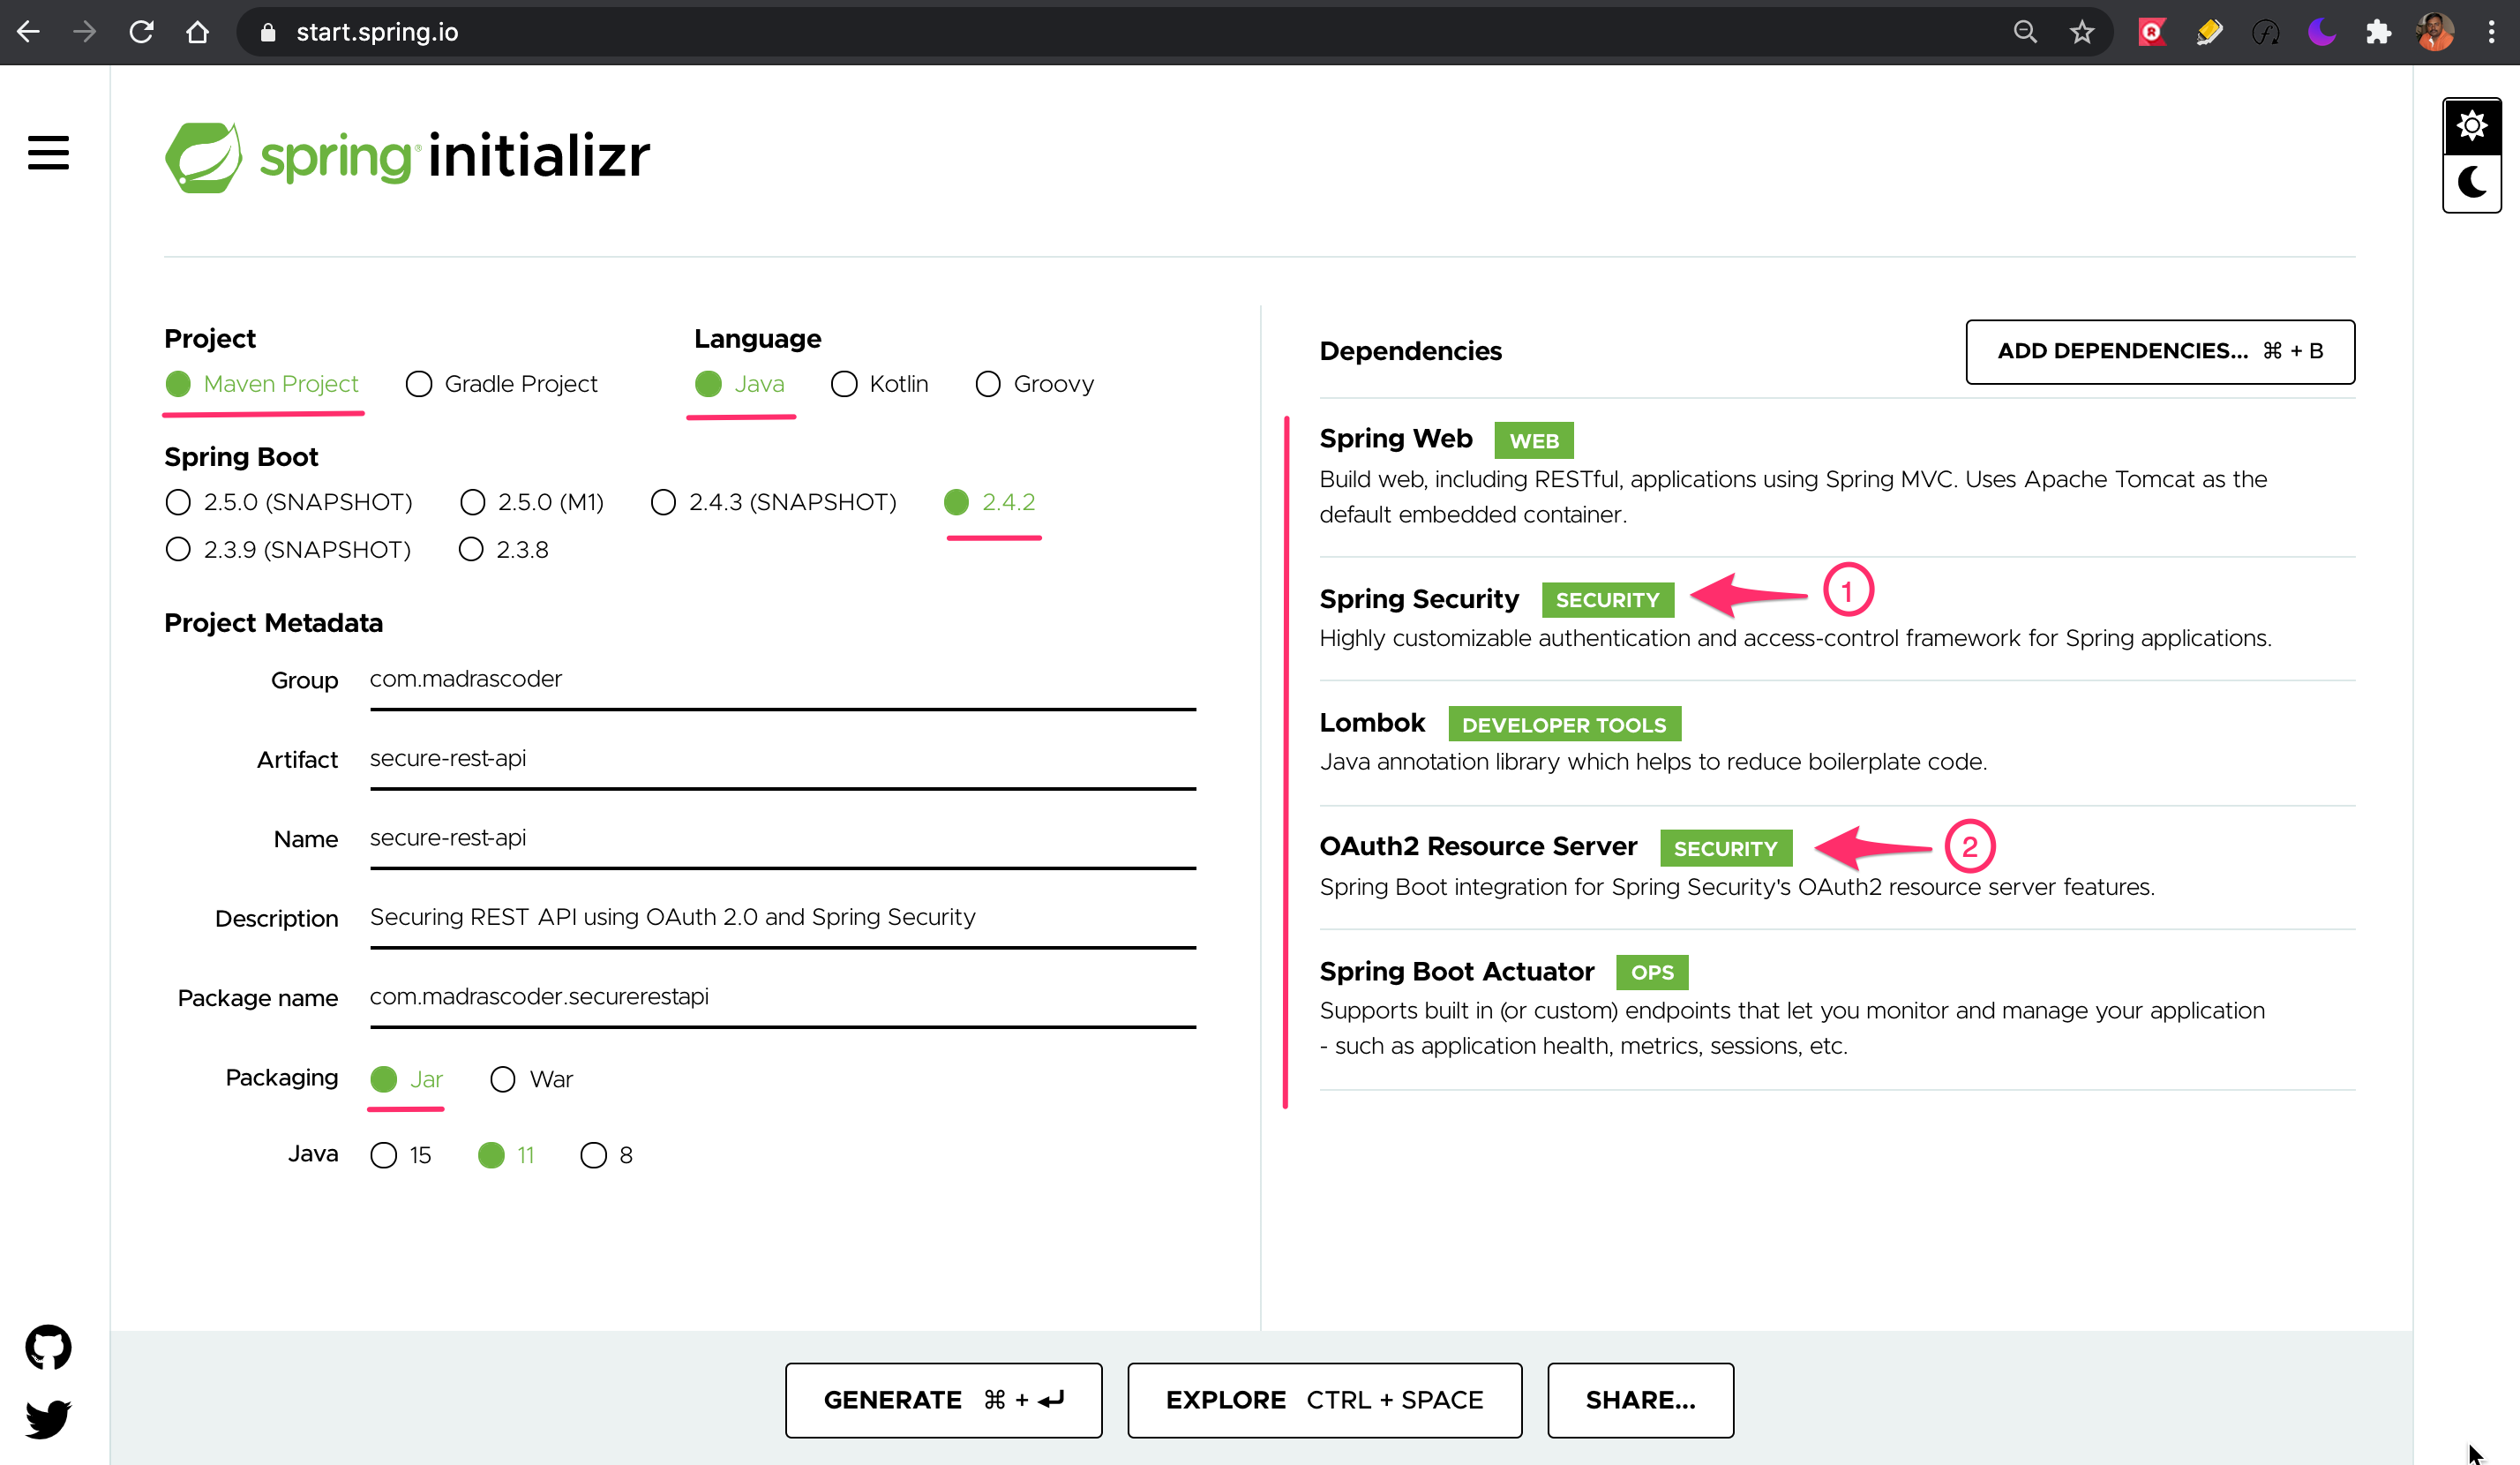
Incase you just want the maven dependencies, here it is…
<dependency>
  <groupId>org.springframework.boot</groupId>
  <artifactId>spring-boot-starter-web</artifactId>
</dependency>
<dependency>
  <groupId>org.springframework.boot</groupId>
  <artifactId>spring-boot-starter-security</artifactId>
</dependency>
<dependency>
  <groupId>org.springframework.boot</groupId>
  <artifactId>spring-boot-starter-oauth2-resource-server</artifactId>
</dependency>
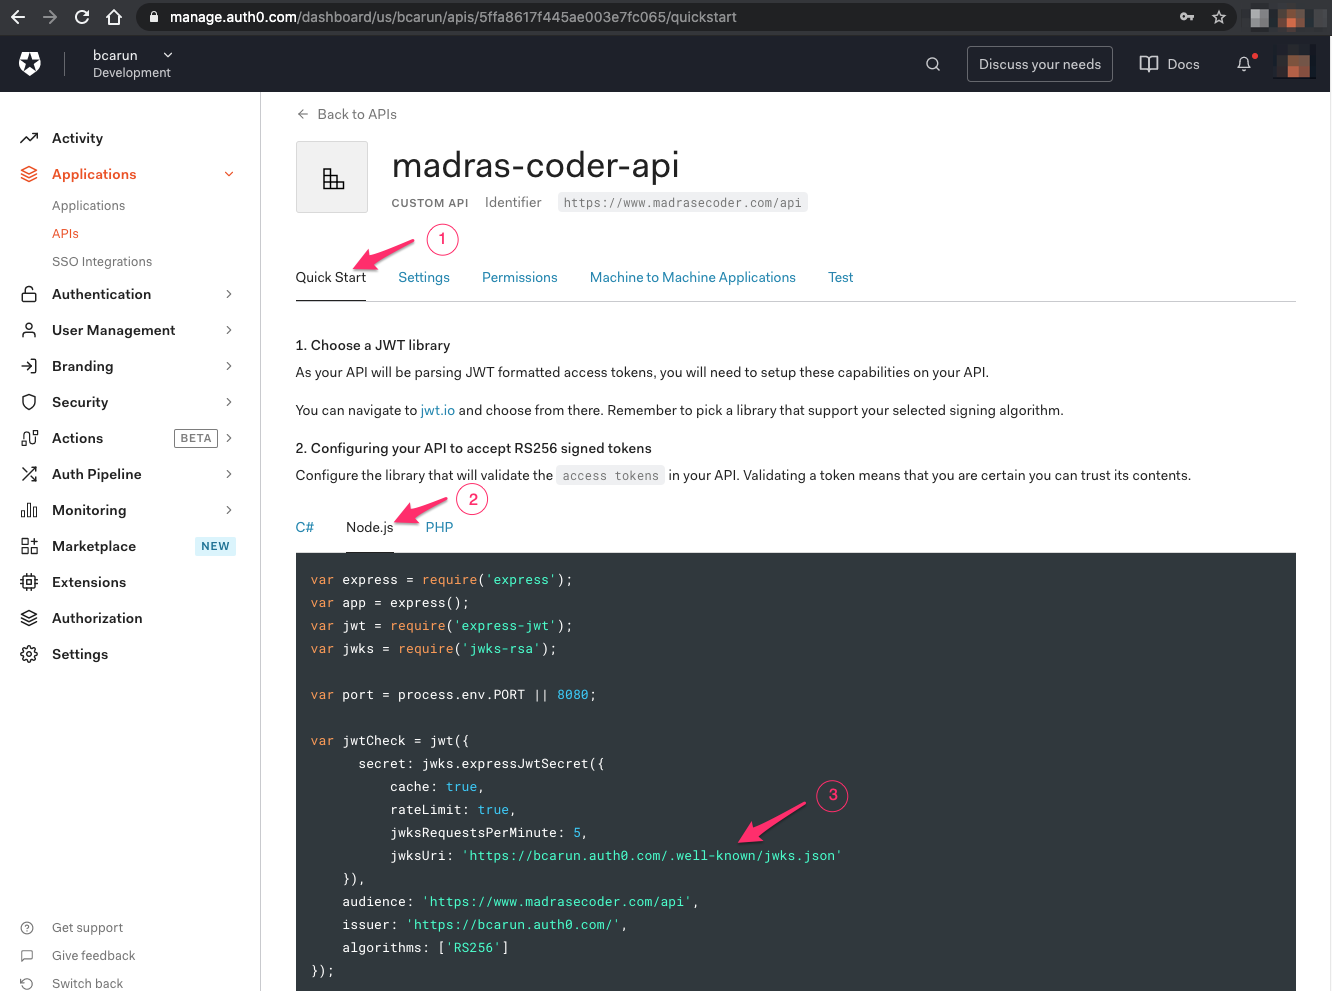
Step 2.2 - Get JSON Web Key Sets URI (jwks URI)
Now that we have the Spring Boot Project, lets us configure OAuth 2.0 Resource Server’s JWK Set URI.
To get the JWK Set URI, you may use the following URL and look for jwks_uri key in response. If you look close at the below URL, you may notice ‘.well-known/openid-configuration’, this is the discovery URL available in any OAuth 2.0 + Open ID 1.0 complaint authorization server.
https://{oauth-provider-hostname}/.well-known/openid-configuration
In my case the wellknown openid discovery URL for my auth0 account is, https://bcarun.auth0.com/.well-known/openid-configuration
Alternate way is,
Select Quickstart ( 1 ), Node.js ( 2 ) and Copy jwksUri ( 3 )
Step 2.3 - Configure JSON Web Key Sets URI (jwks URI) in Spring Boot Web Application
You may copy your Auth0 API Configuration’s JWKS URI and set it in application.properties as stated below
application.properties
# Remember to use your APIs jwk set uri
spring.security.oauth2.resourceserver.jwt.jwk-set-uri=https://bcarun.auth0.com/.well-known/jwks.json
With this jwk-set-uri property and below said ‘WebSecurityConfigurerAdapter’, REST APIs in Spring Boot application require Bearer token in Authorization header for all secure REST APIs.
Step 3. Create and Secure REST APIs
Configure Web Security using WebSecurityConfigurerAdapter.java
Step 3.1 - Create OAuth2SecurityConfigurer.java Class
import org.springframework.security.config.annotation.method.configuration.EnableGlobalMethodSecurity;
import org.springframework.security.config.annotation.web.builders.HttpSecurity;
import org.springframework.security.config.annotation.web.configuration.EnableWebSecurity;
import org.springframework.security.config.annotation.web.configuration.WebSecurityConfigurerAdapter;
import org.springframework.security.config.http.SessionCreationPolicy;

@EnableWebSecurity
@EnableGlobalMethodSecurity(prePostEnabled = true)
public class OAuth2SecurityConfigurer extends WebSecurityConfigurerAdapter {

  @Override
  public void configure(final HttpSecurity http) throws Exception {

    //@formatter:off
    http.sessionManagement().sessionCreationPolicy(SessionCreationPolicy.STATELESS)
        .and()
          .headers().frameOptions().disable()
        .and()
          .csrf().disable()
          .authorizeRequests()
          .antMatchers("/actuator/health") // Health URI
          .permitAll() // Permitted without security
        .and()
          .authorizeRequests()
          .anyRequest() // Any other URI
          .authenticated() // Any other URIs are secured
        .and()
          .oauth2ResourceServer() // App is secured using OAuth 2.0 Protocol (Resource Server)
          .jwt(); // App uses JWT (Json Web Token)
    //@formatter:on
  }
}
Step 3.2 - Create Employee.java class
import java.time.LocalDate;
import lombok.Getter;
import lombok.Setter;
import lombok.ToString;
import lombok.experimental.Accessors;

@Getter
@Setter
@Accessors(chain = true)
@ToString
public class Employee {

  private Long id;
  private String firstName;
  private String lastName;
  private LocalDate dateOfBirth;

}
Step 3.3 - Create EmployeeService.java class
import java.time.LocalDate;
import lombok.extern.slf4j.Slf4j;
import org.springframework.stereotype.Service;

@Slf4j
@Service
public class EmployeeService {

  public Long create(Employee employee) {
    log.info("Save new employee {}", employee);
    return 1L; // Test Purpose
  }

  public Employee getById(Long id) {

    // Test Purpose
    return new Employee().setId(1L)
        .setFirstName("Joseph")
        .setLastName("Alex")
        .setDateOfBirth(LocalDate.now());
  }
}
Step 3.4 - Create EmployeeRestApi.java class
Create REST API and Secure it Using the Permissions Configured in Auth0
import java.net.URI;
import lombok.extern.slf4j.Slf4j;
import org.springframework.http.ResponseEntity;
import org.springframework.security.access.prepost.PreAuthorize;
import org.springframework.security.core.context.SecurityContextHolder;
import org.springframework.web.bind.annotation.GetMapping;
import org.springframework.web.bind.annotation.PathVariable;
import org.springframework.web.bind.annotation.PostMapping;
import org.springframework.web.bind.annotation.RequestBody;
import org.springframework.web.bind.annotation.RequestMapping;
import org.springframework.web.bind.annotation.RestController;
import org.springframework.web.servlet.support.ServletUriComponentsBuilder;

@Slf4j
@RestController
@RequestMapping(path = "/v1/employees")
public class EmployeeRestApi {

  private final EmployeeService employeeService;

  public EmployeeRestApi(EmployeeService employeeService) {
    this.employeeService = employeeService;
  }

  @PostMapping
  @PreAuthorize("hasAuthority('SCOPE_mcapi:create:employee')") // Permission/Scope
  public ResponseEntity<Void> createEmployee(@RequestBody Employee employee) {
    SecurityContextHolder.getContext();
    Long id = employeeService.create(employee);
    final URI uri = ServletUriComponentsBuilder.fromCurrentRequest()
        .path("/{id}")
        .buildAndExpand(id)
        .toUri();

    return ResponseEntity.created(uri)
        .build();
  }

  @GetMapping(path = "/{id}")
  @PreAuthorize("hasAuthority('SCOPE_mcapi:read:employee')") // Permission/Scope
  public ResponseEntity<Employee> getEmployeeById(@PathVariable("id") Long id) {
    Employee employee = employeeService.getById(id);
    return ResponseEntity.ok(employee);
  }
}
Note 1: You may use Roles in Auth0, I strongly recommend to use roles just to encapsulate permissions. Use roles only assigning it to users. In the API, always use Permissions/Scopes.
Note 2: The PreAuthorize annotation used allows the call only if the token contains scope ‘mcapi:create:employee’.
Note 3: The SCOPE prefix is automatically set by Spring Security for all the values extracted from scope claim (key) in JWT.
Step 3.5 - Verify Project Structure
➜  secure-rest-api tree
├── pom.xml
├── src
│   ├── main
│   │   ├── java
│   │   │   └── com
│   │   │       └── madrascoder
│   │   │           └── securerestapi
│   │   │               ├── Employee.java
│   │   │               ├── EmployeeRestApi.java
│   │   │               ├── EmployeeService.java
│   │   │               ├── OAuth2SecurityConfigurer.java
│   │   │               └── Startup.java
│   │   └── resources
│   │       ├── application.properties
│   └── test
│       └── java
|
4. Test REST API
Step 4.1 - Test without ‘Authorization: Bearer {token}’ HTTP Header
HTTP REQUEST
➜ ~ curl -i --request GET 'http://localhost:8080/v1/employees'
HTTP RESPONSE (FAILURE)
HTTP/1.1 401
WWW-Authenticate: Bearer
X-Content-Type-Options: nosniff
X-XSS-Protection: 1; mode=block
Cache-Control: no-cache, no-store, max-age=0, must-revalidate
Pragma: no-cache
Expires: 0
Content-Length: 0
Date: Sun, 07 Feb 2021 03:32:30 GMT
Step 4.2 - Test with ‘Authorization: Bearer {token} HTTP Header and the Token Contains required Scope/Permission
Permissions Setup Required Before Testing
Navigate to API → madras-coder-application(Test Application) to grant permissions to call madras-coder-api.
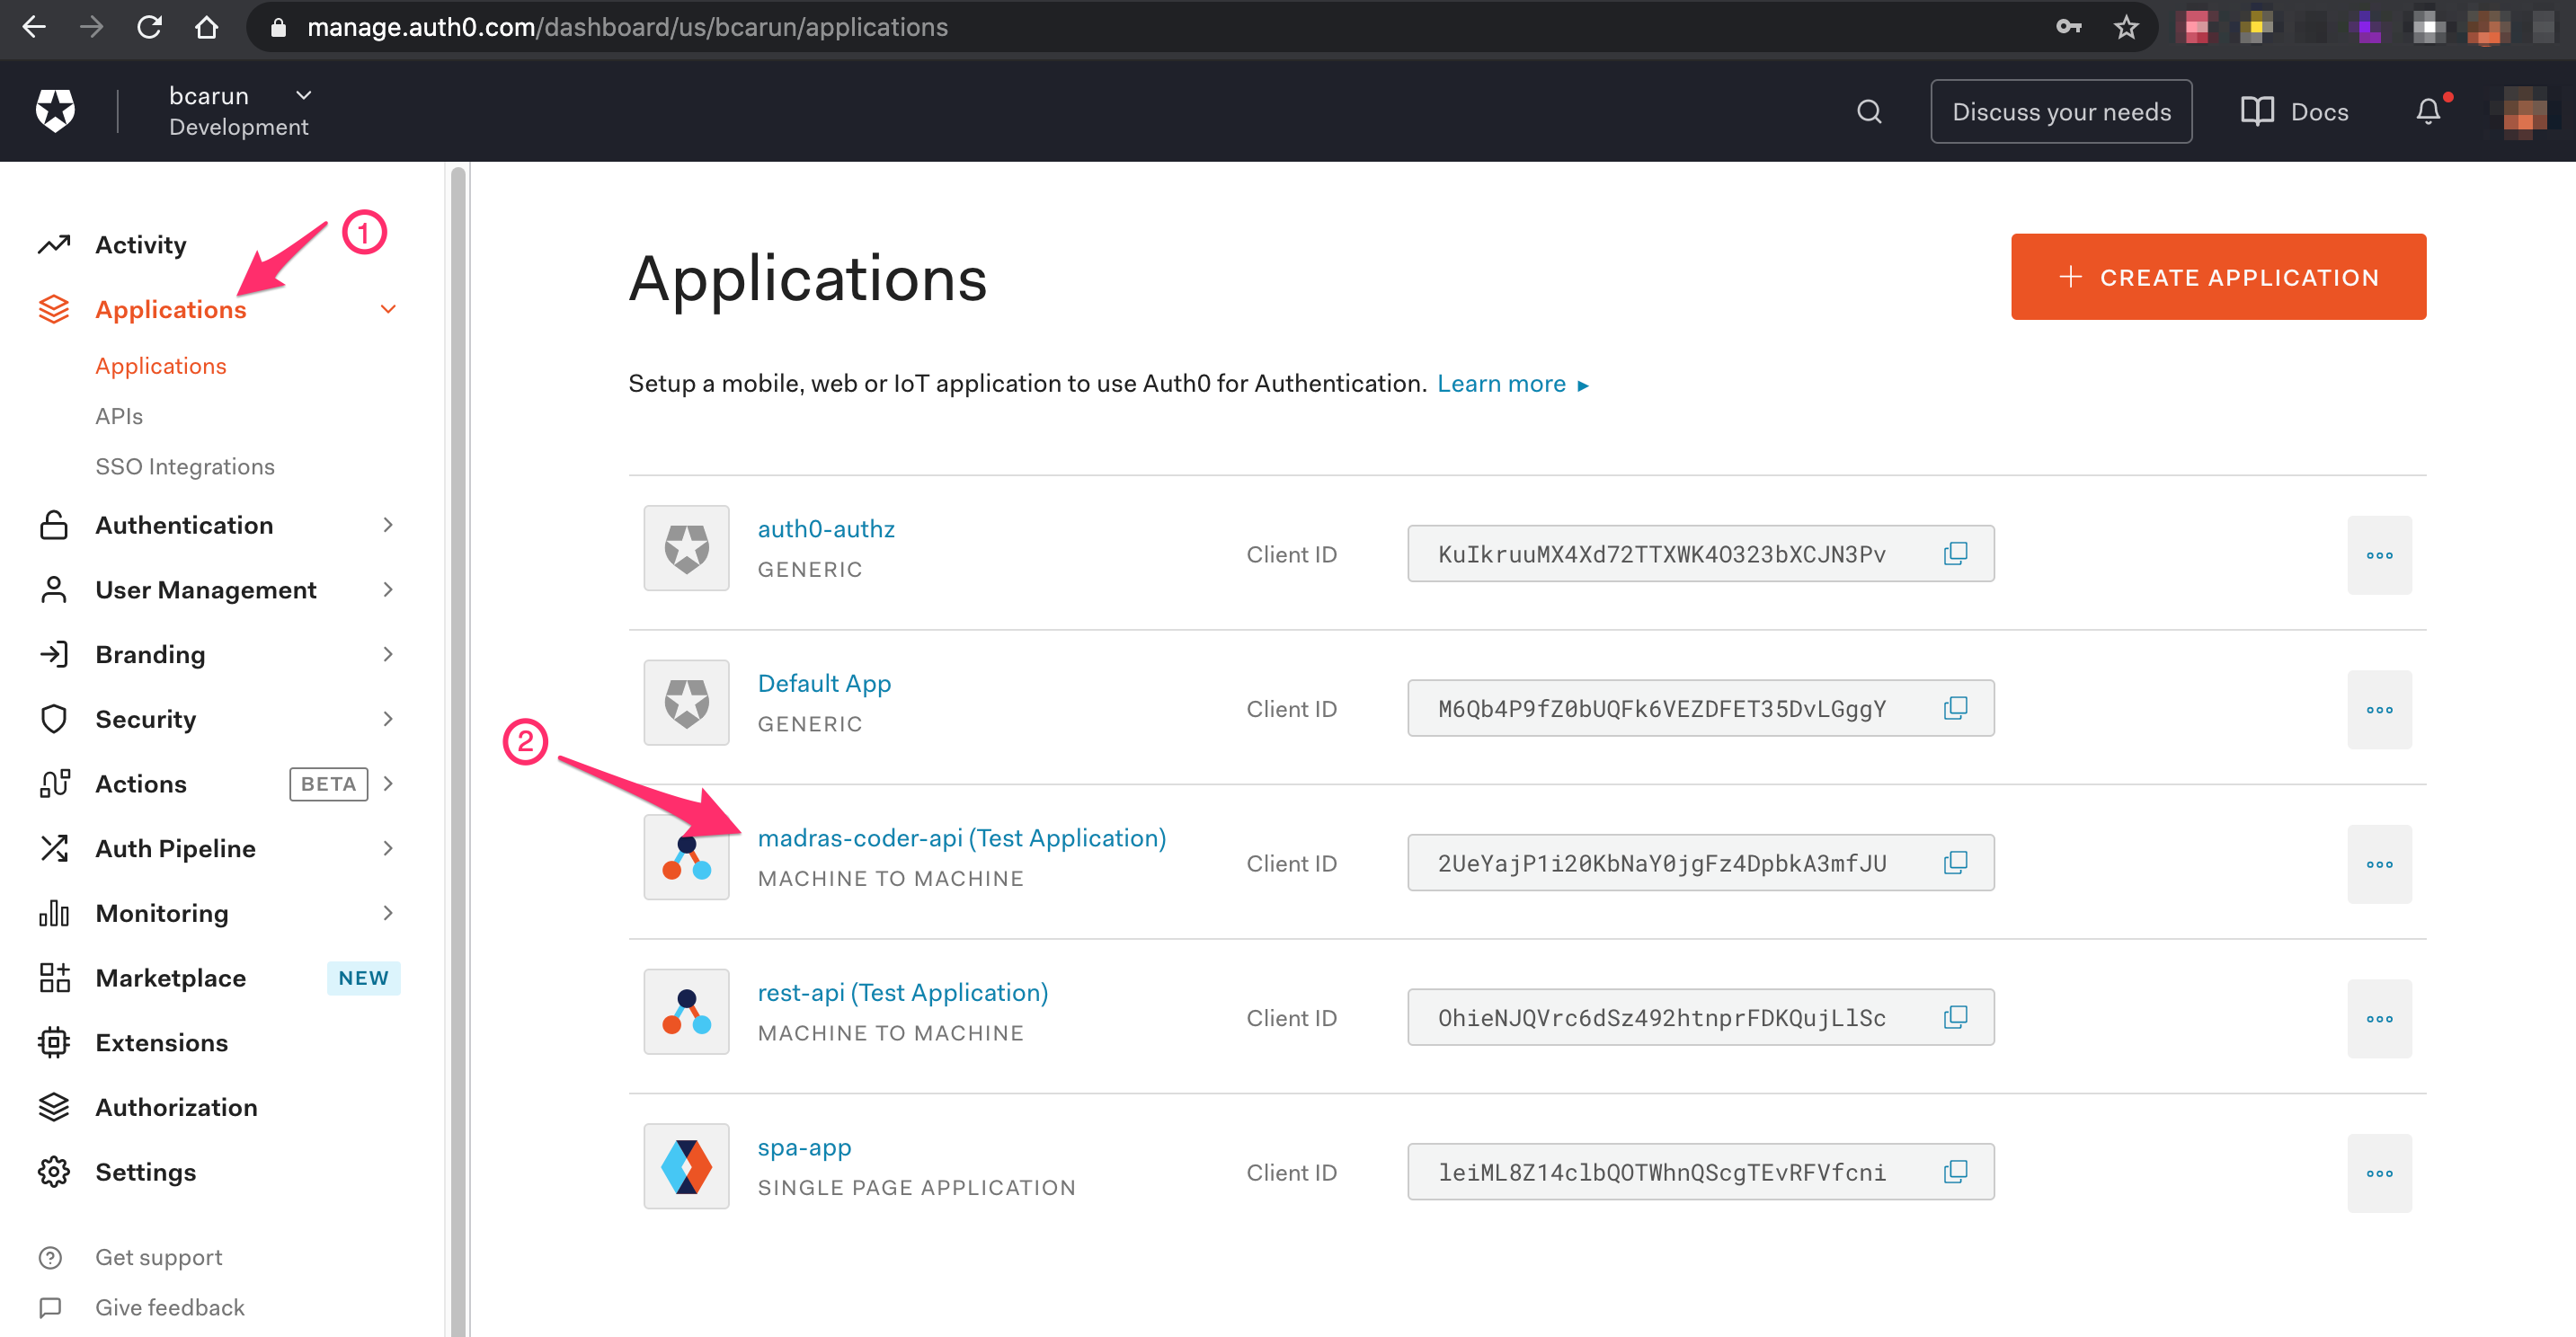
Grant Permissions to Test Application
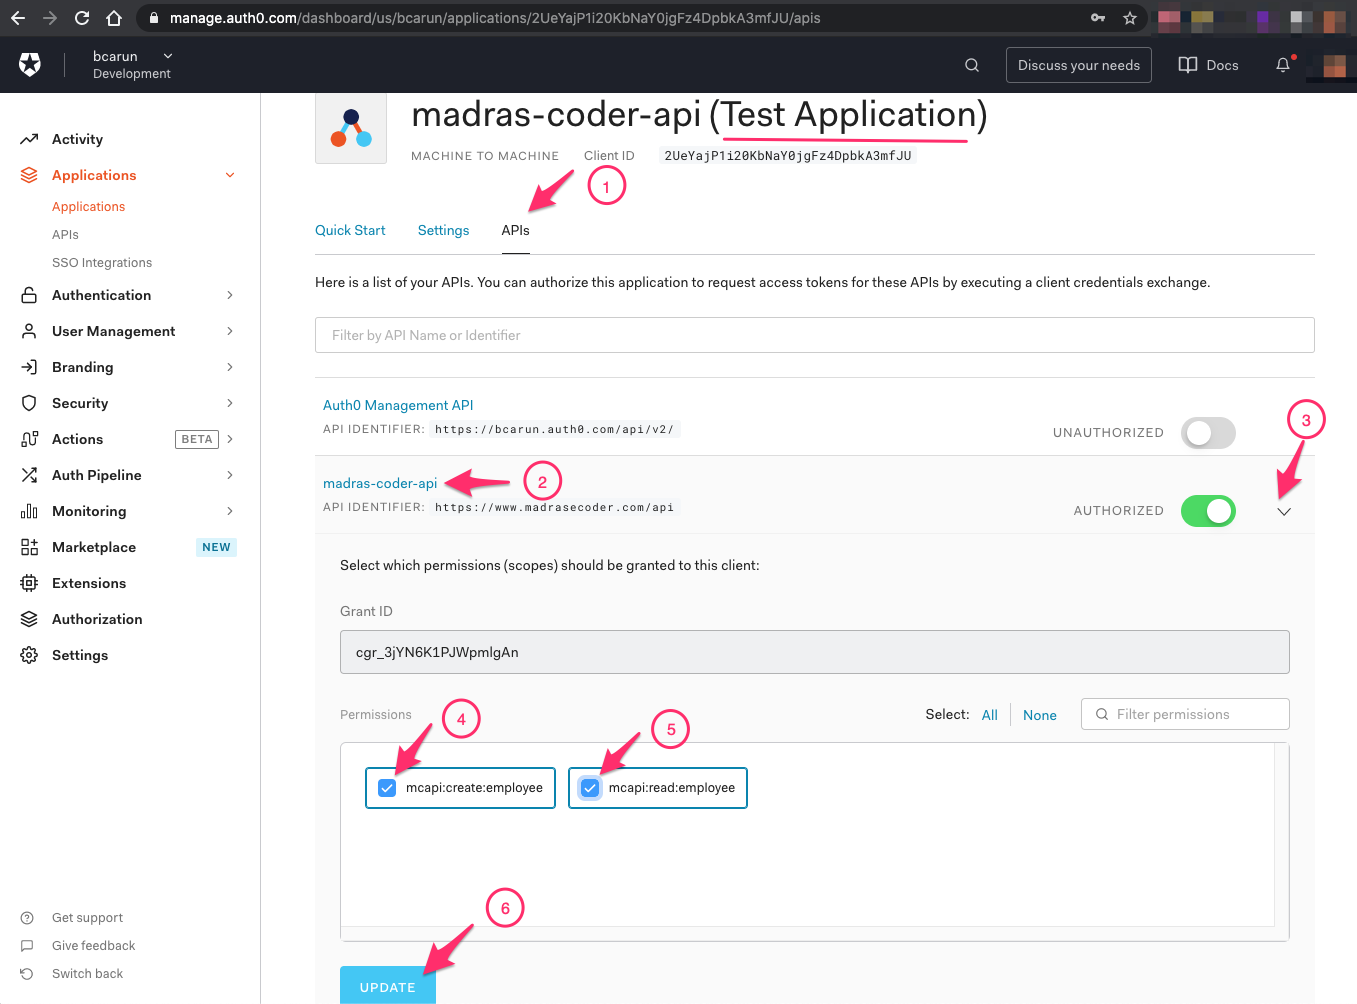
Note: In Auth0 madras-coder-api is API and madras-coder-application(Test Application) is the client app that will get the JWT token to call the API.
GET TOKEN
Navigate to API ( 1 ) → madras-coder-api → Test tab ( 2 ) → cURL → madras-coder-api(Test Application) → Response → Copy Token ( 3 )
For every API configuration created in Auth0, a API Test Client application is created by default. Using the test application we can get the JWT Token.
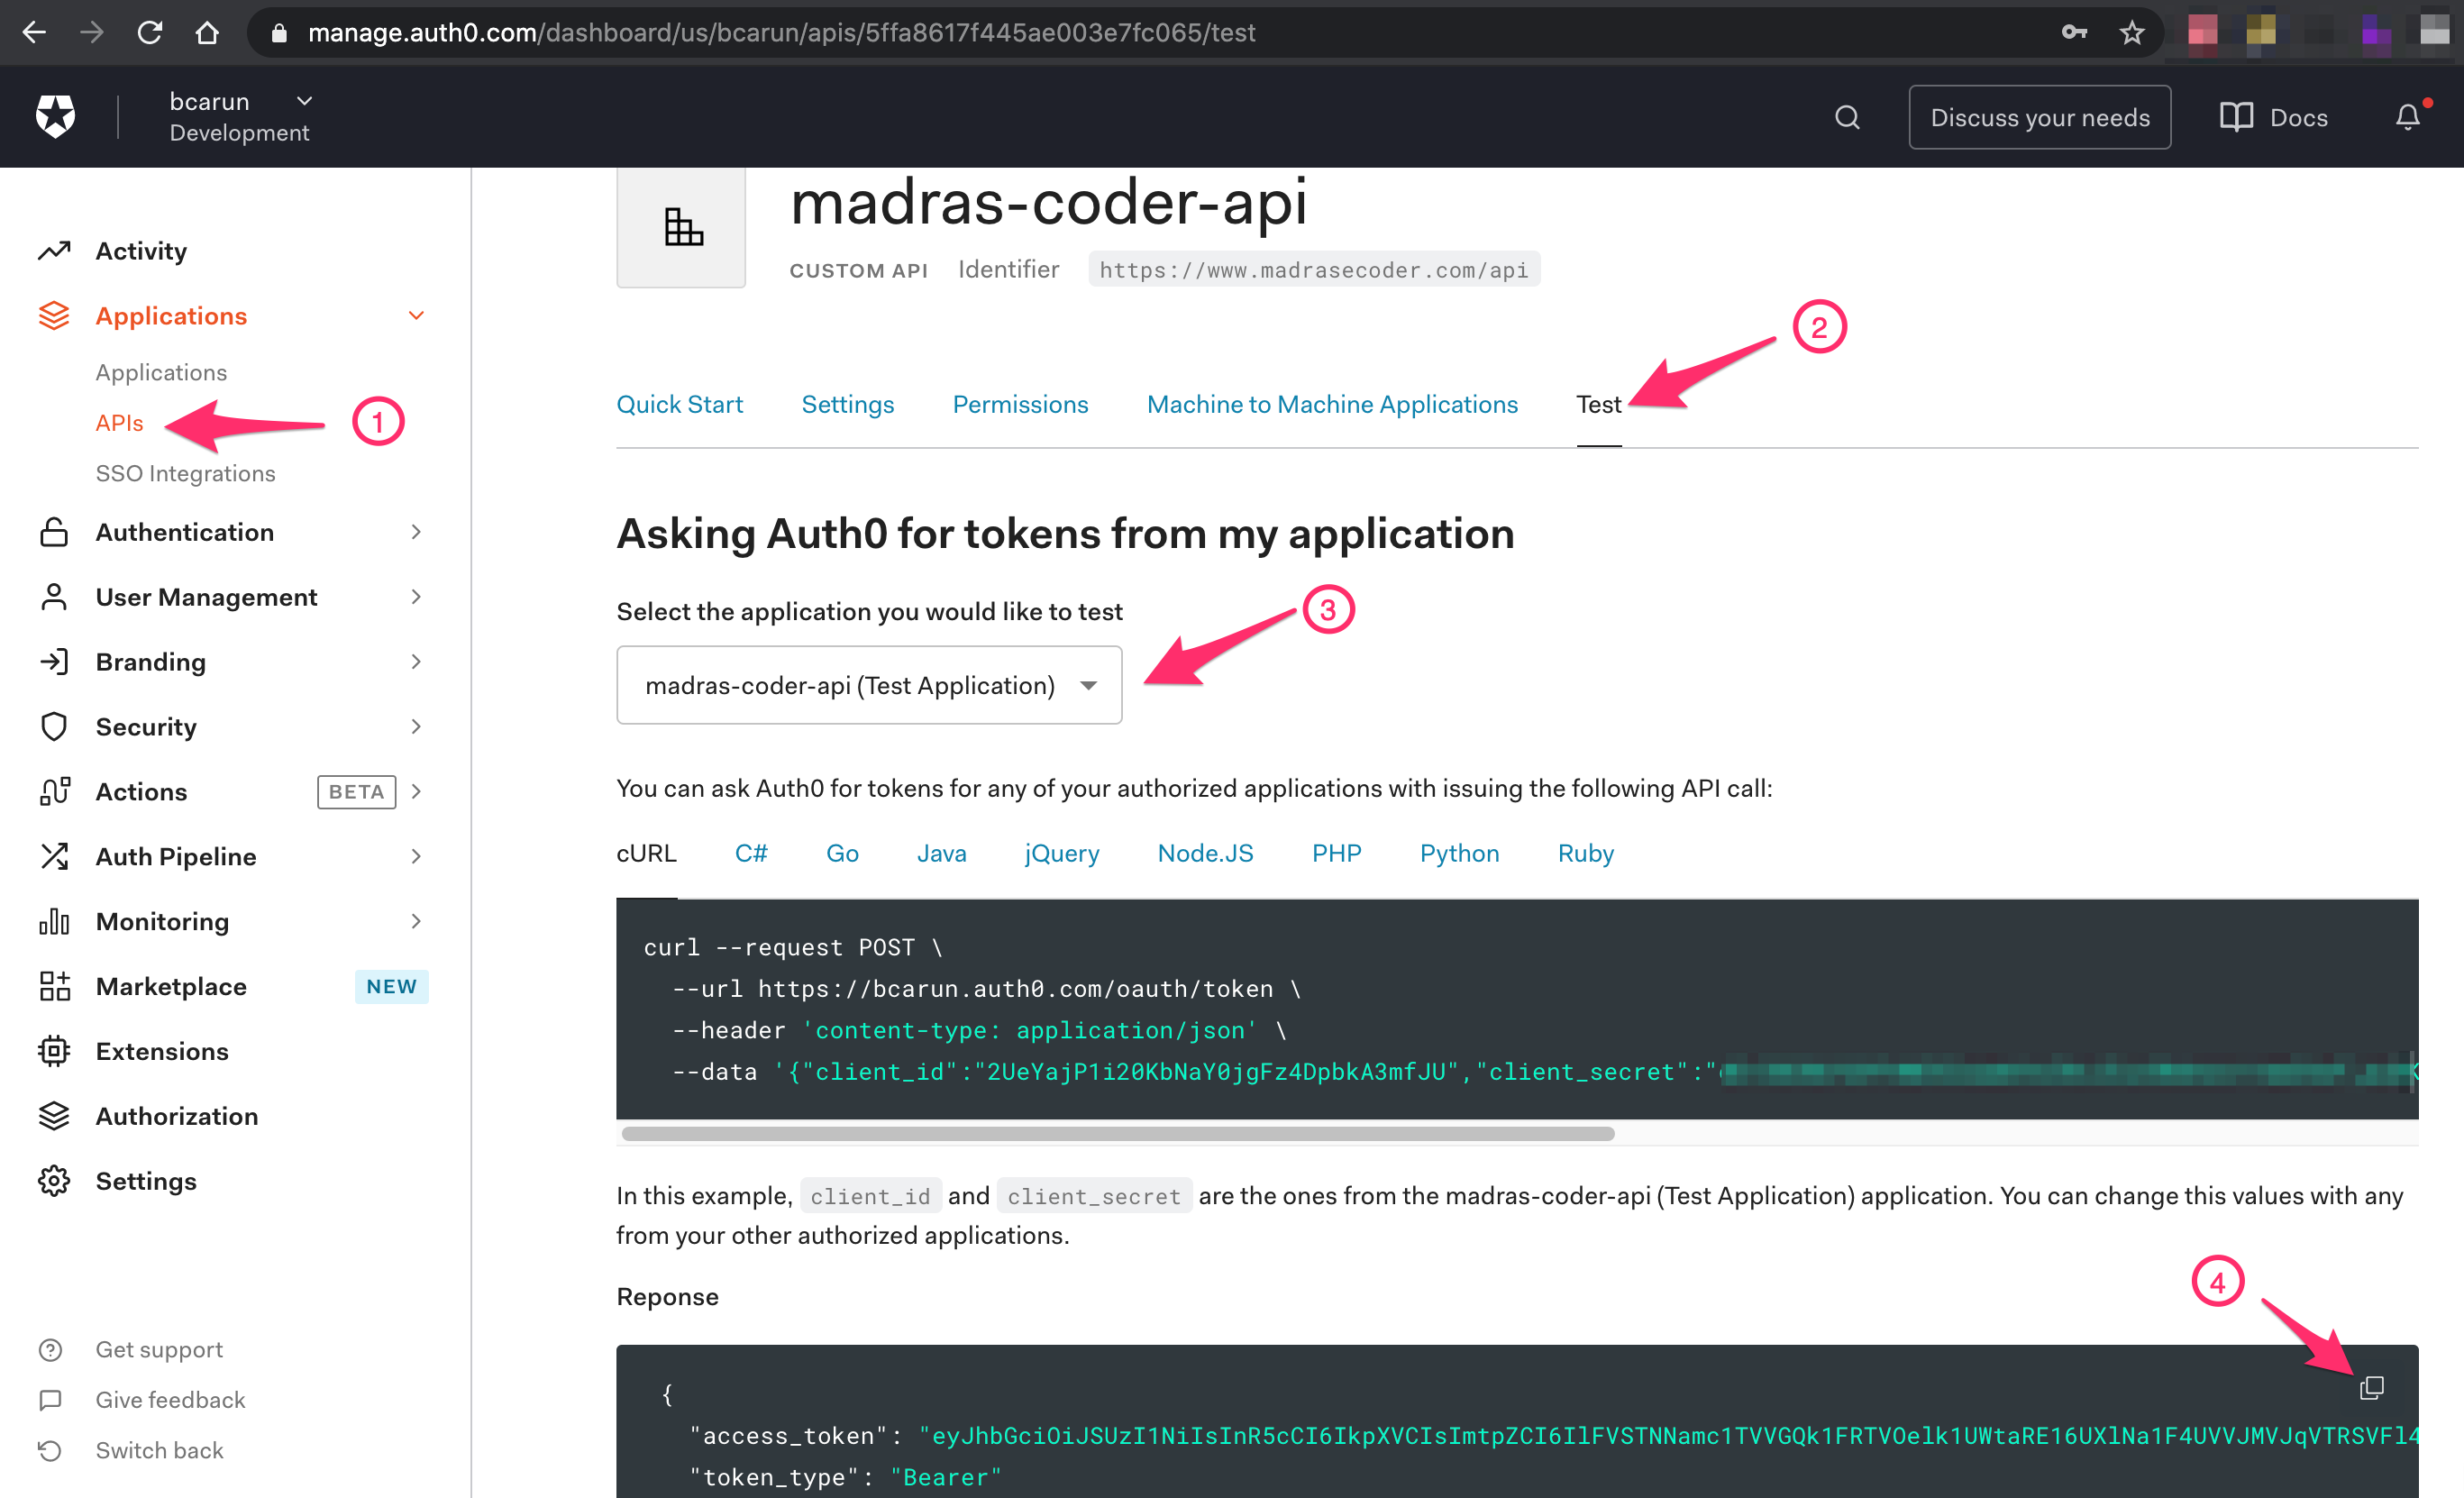
Alternate way is, get the caller application client_id, client_secret and API audience/identifer, replace them in below curl request and try executing the curl command. Get the access_token value from response and use it as value of Bearer token.
TOKEN REQUEST
curl --request POST \
  --url REPLACE-WITH-AUTH0-ISSUER-URL \
  --header 'content-type: application/json' \
  --data '{"client_id":"REPLACE-WITH-TEST-APPLICATION-CLIENT-ID","client_secret":"REPLACE-WITH-TEST-APPLICATION-CLIENT-SECRET","audience":"REPLACE-WITH-API-IDENTIFER","grant_type":"client_credentials"}'
TOKEN RESPONSE
{
  "access_token": "eyJhbGciOiJSUzI1NiIsInR5cCI6IkpXVCIsImtpZCI6IlFVSTNNamc1TVVGQk1FRTVOelk1UWtaRE16UXlNa1F4UVVJMVJqVTRSVFl4UmpJNE5EUTJSZyJ9.eyJpc3MiOiJodHRwczovL2JjYXJ1bi5hdXRoMC5jb20vIiwic3ViIjoiMlVlWWFqUDFpMjBLYk5hWTBqZ0Z6NERwYmtBM21mSlVAY2xpZW50cyIsImF1ZCI6Imh0dHBzOi8vd3d3Lm1hZHJhc2Vjb2Rlci5jb20vYXBpIiwiaWF0IjoxNjEyNjgyNTEzLCJleHAiOjE2MTI3Njg5MTMsImF6cCI6IjJVZVlhalAxaTIwS2JOYVkwamdGejREcGJrQTNtZkpVIiwic2NvcGUiOiJtY2FwaTpjcmVhdGU6ZW1wbG95ZWUgbWNhcGk6cmVhZDplbXBsb3llZSIsImd0eSI6ImNsaWVudC1jcmVkZW50aWFscyJ9.qFOPXNiMeTn4_NK5TMAroHq-Xs7bUMxrYf0RgignEAGX2c_96LQHNFoQrt6uCvVSWP2DhL4HS_BwexDdJ751IDJSMriAGUDkYzyXkRd5ebXgzs1BIG_S8iUw9hk1aOmUd9nxIRVDPWAA14KFwaPsv6uwIDJ4g4lRe0Wnb9GtikMerx_Z4ySWfHL9F8uSUTW3Q7wb-F1s-qnSZxNYPrPdlOKgQEsrzSTUO5Z74YyYlANR3J0NfdFef1XwfGhftxsWAazDMGDej3gYf9Zlx5GBxIExOWR8QET0_lXJjXLRnNgHnBa2KNFP1Ef-DlFcAs8MzP9HO3iCrlGH7cy3UJCrTg",
  "token_type": "Bearer"
}
Get the access_token value from response and use it as value for Bearer token for below request.
Step 4.3 - Test with Authorization Header having Access Token (Bearer Token)
HTTP REQUEST
➜  ~ curl -i --request POST 'http://localhost:8080/v1/employees' \
--header 'Authorization: Bearer eyJhbGciOiJSUzI1NiIsInR5cCI6IkpXVCIsImtpZCI6IlFVSTNNamc1TVVGQk1FRTVOelk1UWtaRE16UXlNa1F4UVVJMVJqVTRSVFl4UmpJNE5EUTJSZyJ9.eyJpc3MiOiJodHRwczovL2JjYXJ1bi5hdXRoMC5jb20vIiwic3ViIjoiMlVlWWFqUDFpMjBLYk5hWTBqZ0Z6NERwYmtBM21mSlVAY2xpZW50cyIsImF1ZCI6Imh0dHBzOi8vd3d3Lm1hZHJhc2Vjb2Rlci5jb20vYXBpIiwiaWF0IjoxNjEyNjgyNTEzLCJleHAiOjE2MTI3Njg5MTMsImF6cCI6IjJVZVlhalAxaTIwS2JOYVkwamdGejREcGJrQTNtZkpVIiwic2NvcGUiOiJtY2FwaTpjcmVhdGU6ZW1wbG95ZWUgbWNhcGk6cmVhZDplbXBsb3llZSIsImd0eSI6ImNsaWVudC1jcmVkZW50aWFscyJ9.qFOPXNiMeTn4_NK5TMAroHq-Xs7bUMxrYf0RgignEAGX2c_96LQHNFoQrt6uCvVSWP2DhL4HS_BwexDdJ751IDJSMriAGUDkYzyXkRd5ebXgzs1BIG_S8iUw9hk1aOmUd9nxIRVDPWAA14KFwaPsv6uwIDJ4g4lRe0Wnb9GtikMerx_Z4ySWfHL9F8uSUTW3Q7wb-F1s-qnSZxNYPrPdlOKgQEsrzSTUO5Z74YyYlANR3J0NfdFef1XwfGhftxsWAazDMGDej3gYf9Zlx5GBxIExOWR8QET0_lXJjXLRnNgHnBa2KNFP1Ef-DlFcAs8MzP9HO3iCrlGH7cy3UJCrTg' \
--header 'Content-Type: application/json' \
--data-raw '{
    "firstName" : "Joseph",
    "lastName": "Alex",
    "joiningDate" : "2021-01-01"
}'
HTTP RESPONSE (SUCCESS)
HTTP/1.1 201
Location: http://localhost:8080/v1/employees/1
X-Content-Type-Options: nosniff
X-XSS-Protection: 1; mode=block
Cache-Control: no-cache, no-store, max-age=0, must-revalidate
Pragma: no-cache
Expires: 0
Content-Length: 0
Date: Sun, 07 Feb 2021 07:32:40 GMT
Appendix
To inspect the JWT/access_token, you may copy paste ( 1 ) the token value in JWT.io and look at the contents ( 2 ). This is very helpful in troubleshooting.
