
Setup and Run Java Spring Boot Project with Cucumber
In this chapter, let us setup a Java, Spring Boot project with Cucumber, create a simple feature file, implement the step definitions for the Given, When, Then steps in that feature file and run it. Just follow along the chapter and try doing all the steps. This will give some familiarity to Cucumber and Behavior Driven Development (BDD). We will learn the concepts as we go.
1. Prerequisites
For this tutorial, let us use the following
1. Java 11 LTS
2. Cucumber 6.8.1
3. Spring Boot 2.4.4
4. Intellij IDE (You may use your favorite IDE)
2. Create a Spring Boot Project using Spring Initializer
There are 2 ways you can create a Spring Boot project.
- Using Spring Initializer website Spring Initializer
- Use Spring Initializer in your IDE
In this chapter, let us use the option 1 (Using Spring Initializer website). Click the Spring initializer link to open Spring Initializer website and choose Maven Project, Java Language, Spring Boot version, Java version and all dependencies stated in the below image.
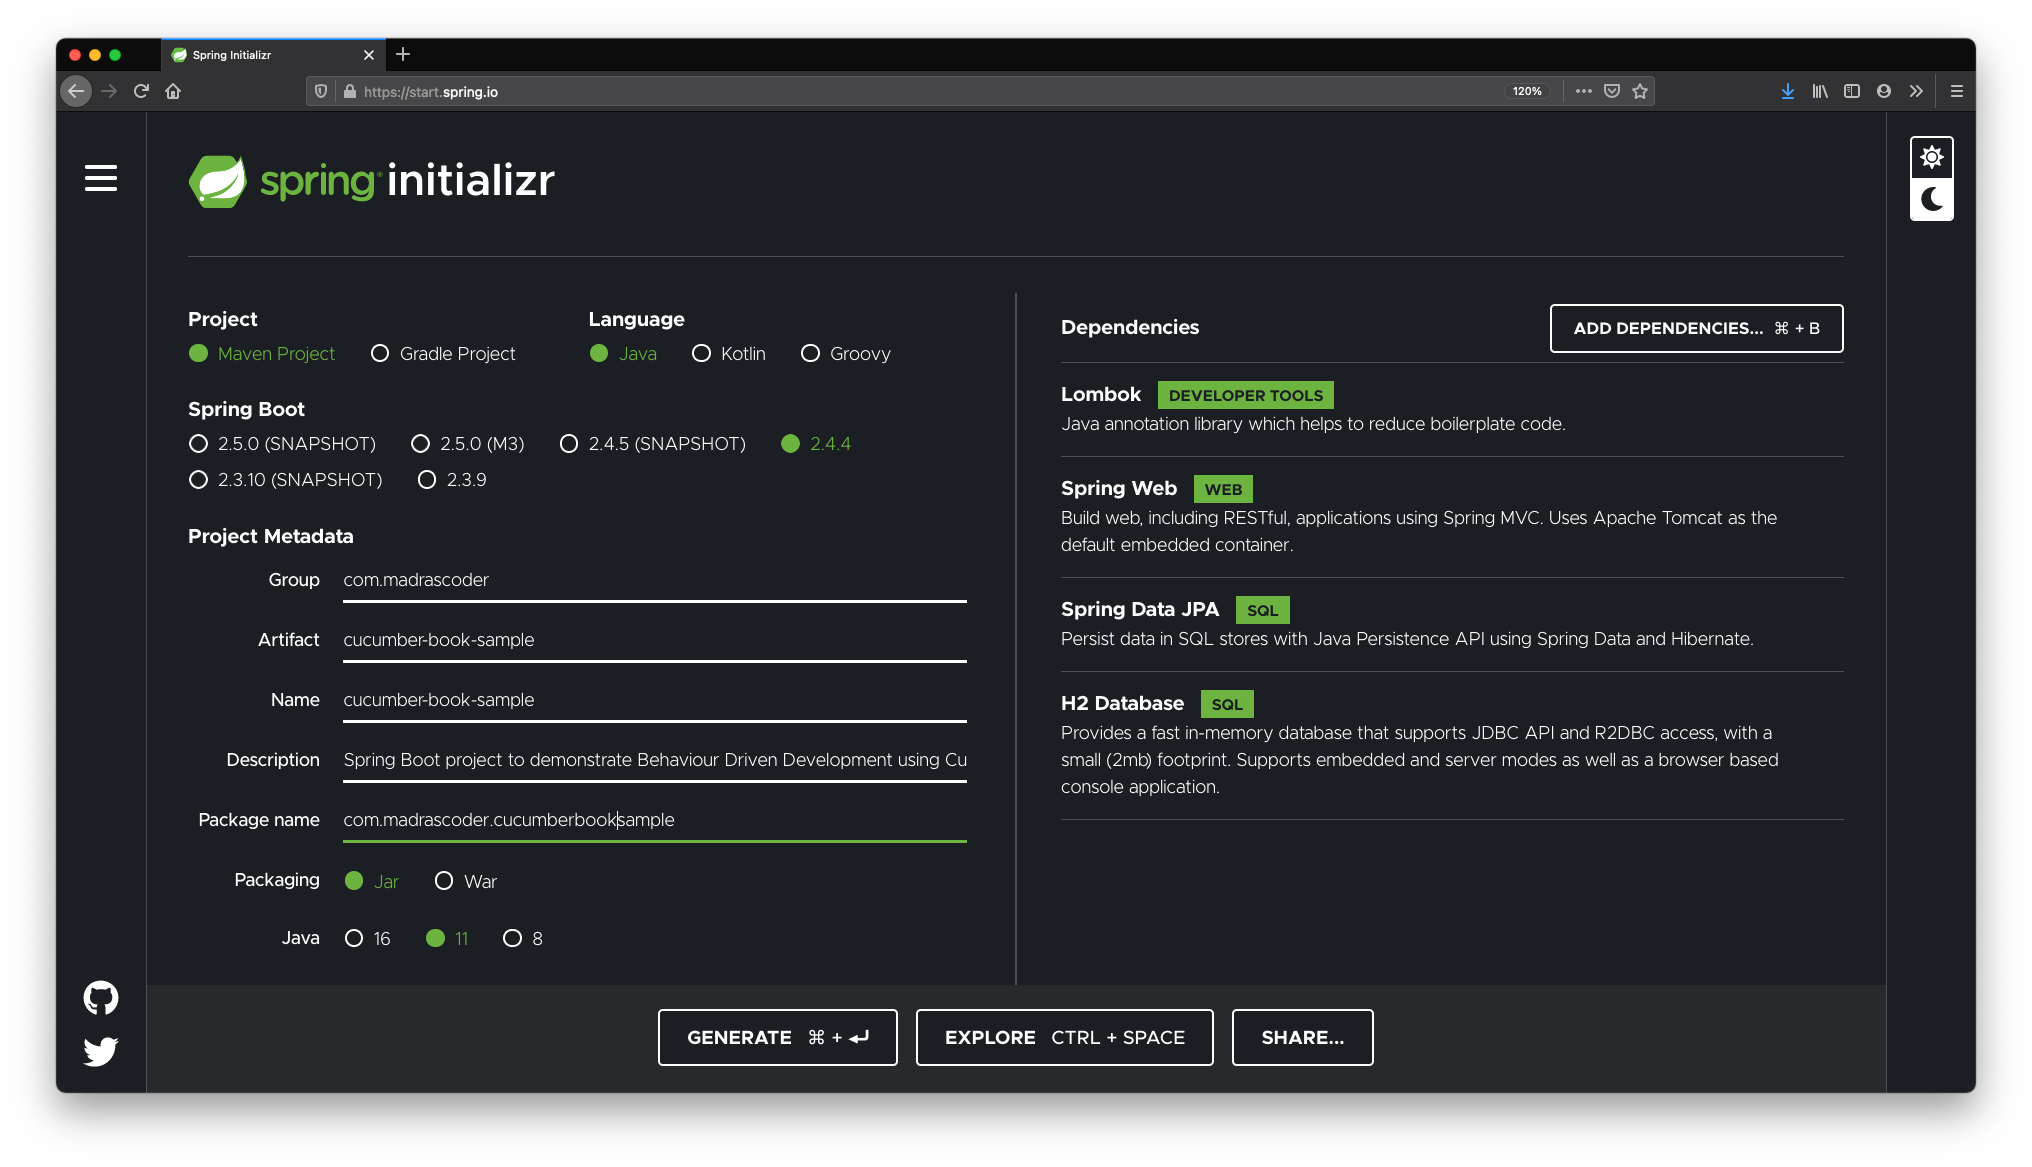
After choosing Java version, Spring Boot version and above said dependencies, click on Generate button.
Spring Initializer will trigger a zip file download, you may unzip it and import/open the project into you favorite IDE.
3. Add Maven Dependencies
Add the following Cucumber dependencies to pom.xml file.
<!--
Java implementation of Cucumber BDD framework
https://github.com/cucumber/cucumber-jvm
-->
<dependency>
  <groupId>io.cucumber</groupId>
  <artifactId>cucumber-java</artifactId>
  <version>6.8.1</version>
  <scope>test</scope>
</dependency>

<!--
Library to use JUnit Platform to execute Cucumber Scenarios
This also helps IDE to discover and run Cucumber tests
https://github.com/cucumber/cucumber-jvm/tree/main/junit-platform-engine
-->
<dependency>
  <groupId>io.cucumber</groupId>
  <artifactId>cucumber-junit-platform-engine</artifactId>
  <version>6.8.1</version>
</dependency>

<!--
Library to access Spring Application Context and share
state between cucumber step execution
-->
<dependency>
  <groupId>io.cucumber</groupId>
  <artifactId>cucumber-spring</artifactId>
  <version>6.8.1</version>
  <scope>test</scope>
</dependency>

<!--
  Spring doesn't include the right version for surefire to pickup
  TODO: Remove once the surefire or spring is upgraded
  [Recommended by Cucumber JVM committers]
-->
<dependency>
  <groupId>org.junit.platform</groupId>
  <artifactId>junit-platform-commons</artifactId>
  <version>1.7.1</version>
  <scope>test</scope>
</dependency>
4. Setup Cucumber Spring Context Configuration
Navigate to following location and create a class to declare the Cucumber Spring Context Configuration annotation.
cd src/test/java/com/madrascoder/cucumberbooksample/
touch CucumberSpringContextConfiguration.java
Add following code,
import io.cucumber.spring.CucumberContextConfiguration;
import org.springframework.boot.test.context.SpringBootTest;
import org.springframework.boot.test.context.SpringBootTest.WebEnvironment;

@SpringBootTest(webEnvironment = WebEnvironment.RANDOM_PORT)
@CucumberContextConfiguration
public class CucumberSpringContextConfiguration {}
This configures the application context that Cucumber should use. In this case, it is implicit, test will use Spring Boot application main class automatically.
5. Create a Class to Trigger Cucumber Test
Navigate to following location and create a new class,
cd src/test/java/com/madrascoder/cucumberbooksample
touch RunCucumberTest.java
Add following code,
package com.madrascoder.cucumberbooksample;
import io.cucumber.junit.platform.engine.Cucumber;
@Cucumber
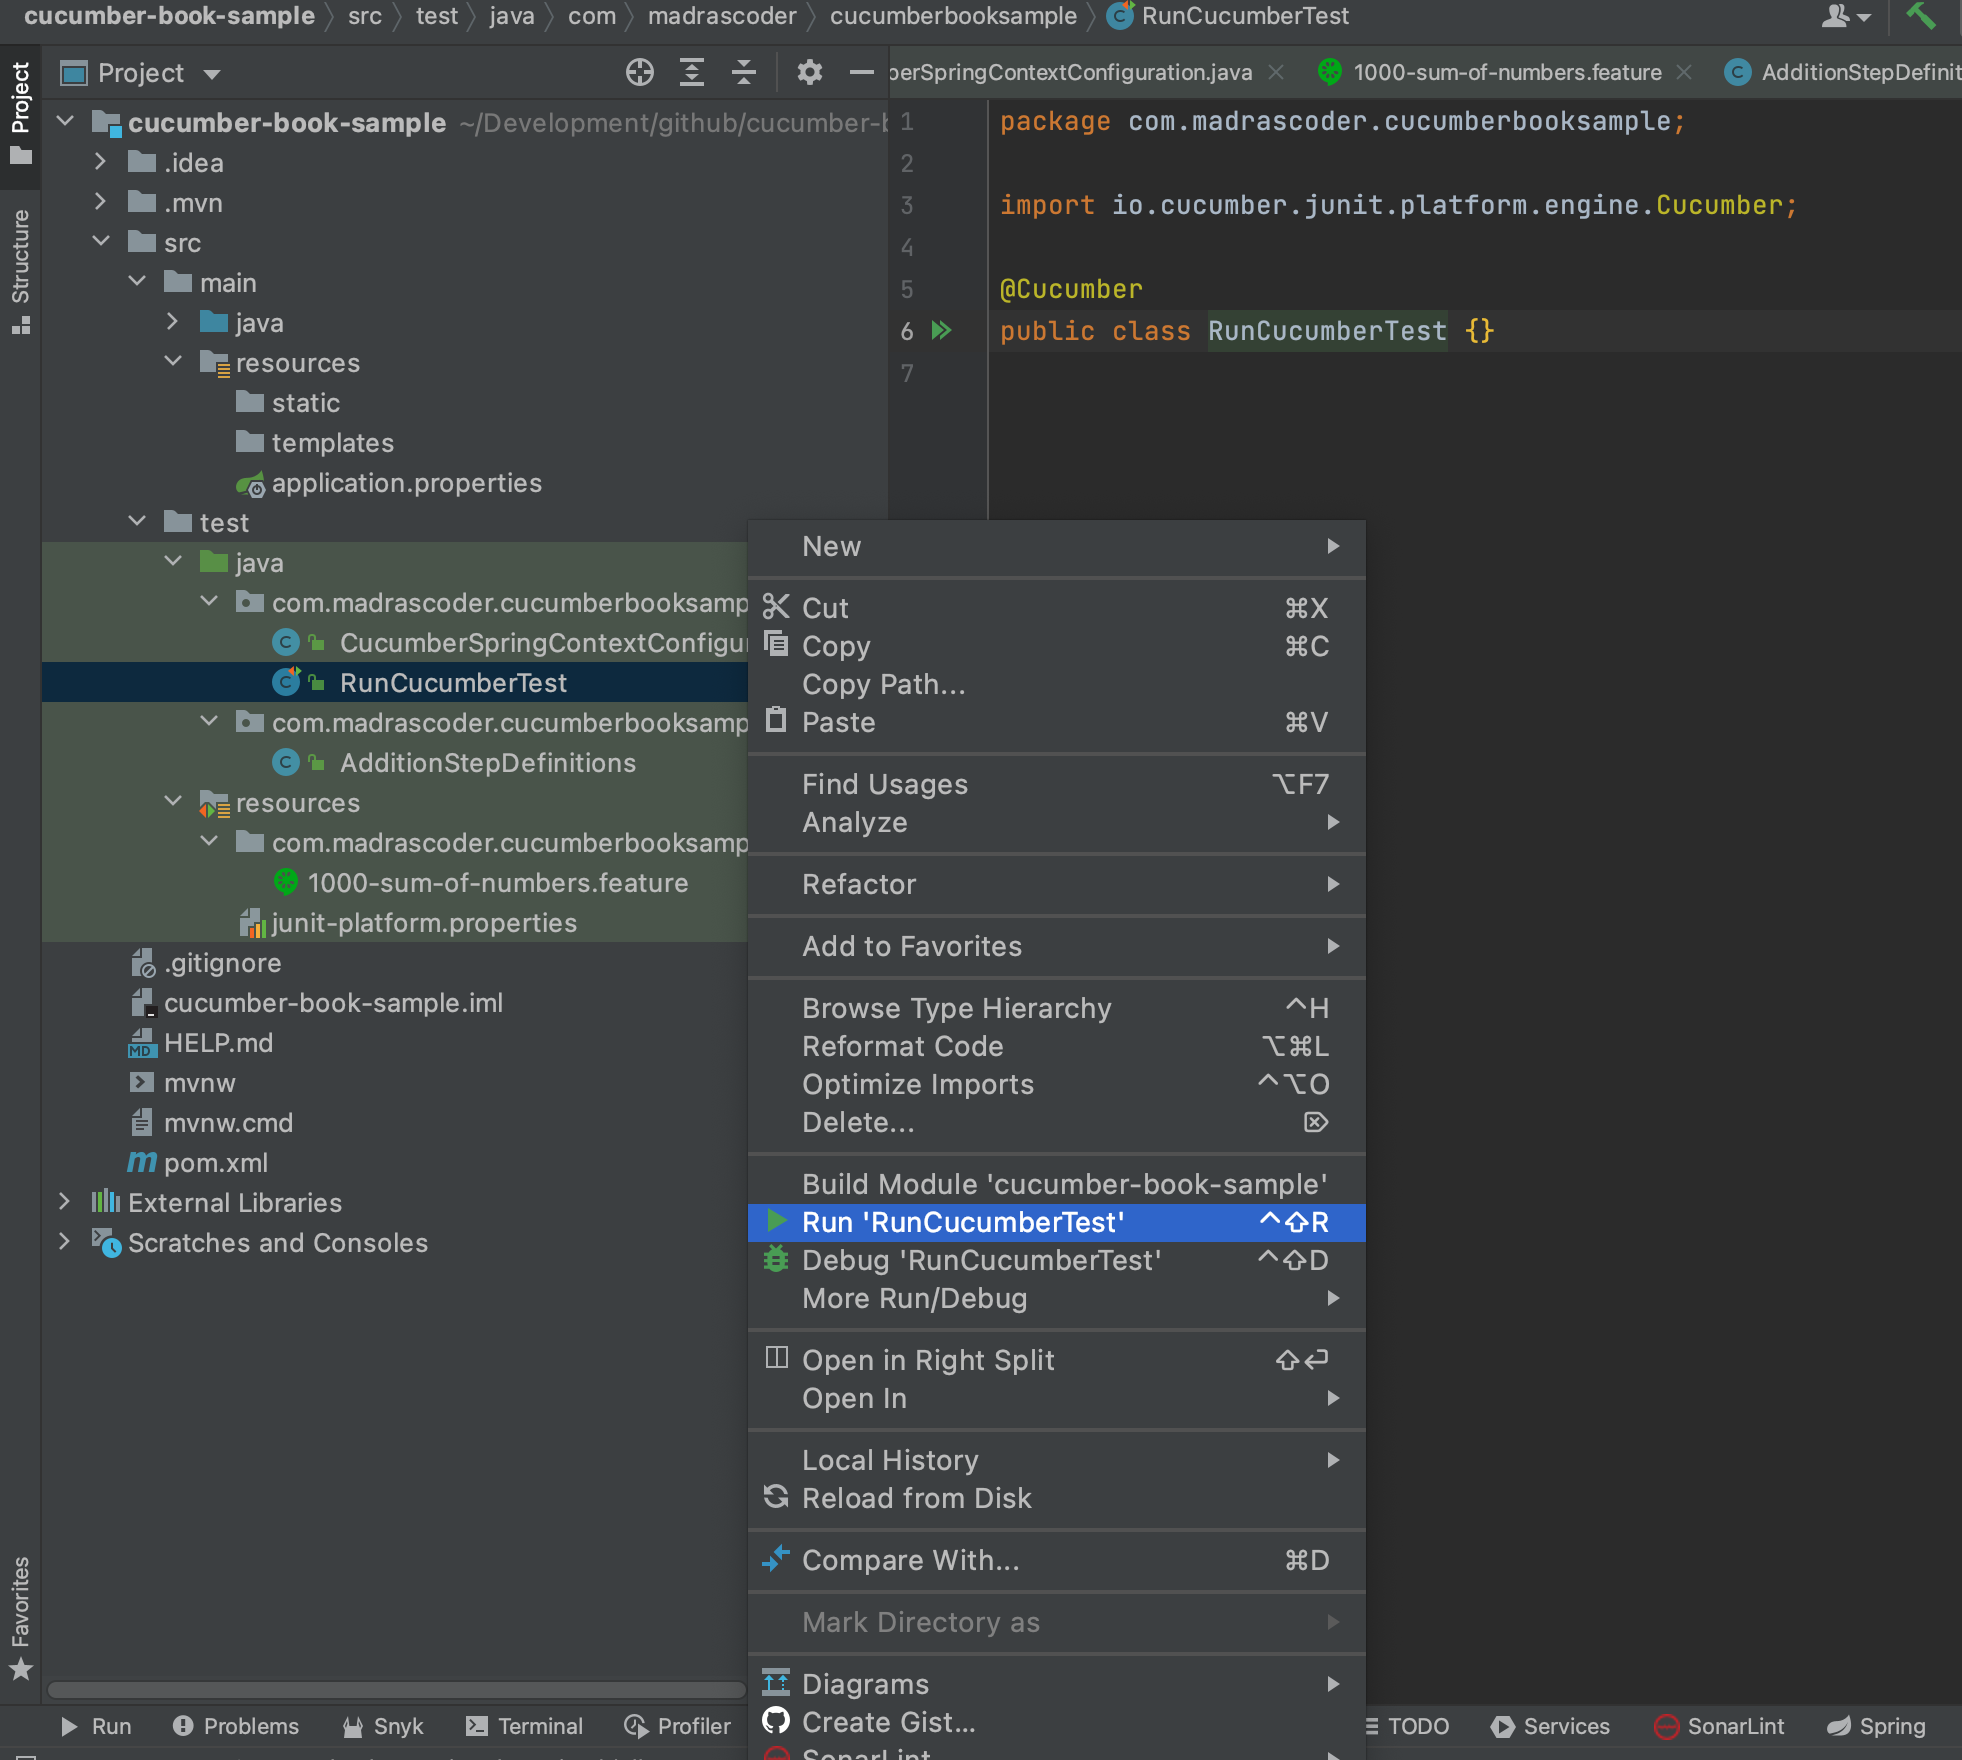
public class RunCucumberTest {}
RunCucumberTest class helps IDE to discover and run Cucumber feature files and step definitions in the respective package. You may right click to run all Cucumber tests using this class.
This is automatically run by maven as well.
6. Configure Cucumber Plugin Using JUnit Properties
Navigate to following location and create a new properties file,
cd src/test/resources
touch junit-platform.properties
Add the following properties,
# Options if you don't want to publish test umber reports to
# https://reports.cucumber.io cloud
cucumber.publish.quiet=true
cucumber.publish.enabled=false

# Cucumber Test Report Generation Plugins. Html report is generated
# and packaged along with the application.
cucumber.plugin=pretty,html:target/classes/static/features/index.html
For other available Cucumber properties, you may refer to Cucumber Properties
7. Let’s Create our First Feature File
In this chapter and the next one, we will use a feature file that is not something we do in a day to day work. This is just to make you understand the concepts. In later chapters we will create feature files for ‘HR Software’. These will be more realistic and similar to what we do in our daily work. So please hold on.
Navigate to following location and Create a file named 1000-sum-of-numbers.feature,
cd src/test/resources/com/madrascoder/cucumberbooksample
touch 1000-sum-of-numbers.feature
Important Note: Remember, you have to create multiple directories and not one directory as com.madrascoder.cucumberbooksample like what you do for package. This is src/test/resources directory and not src/test/java so don’t create directories like how you create package in Java.
Add the following Gherkin or feature to it,
Feature: Addition
  Scenario: Sum of two numbers
    Given first number is 10
    And second number is 20
    When user executes sum function
    Then the sum is 30
Note: Package structure of step definition Java classes under src/test/java should match with the directory structure of feature files in src/test/resources as Cucumber looks for feature files there.
Feature file is created using something called Gherkin. This is one of the ways to represent the requirement or executable specifications of the software. A file that contains a feature of the software product is called a feature file. Important keywords here are Feature, Scenario, Given, And, When, Then, Scenario Outline, Examples.
Feature: Every feature file contains a feature of the software product. A feature may contain one or more Scenarios.
Scenario: It is nothing but a representation of test case or behavior of the software using Given, When, Then Gherkin words. You may also use And and But as Gherkin words. Imagine these as reserved words of the feature file.
Given, When, And, Then: These are the steps in the test case or scenario. Each Given/When/And/But/Then step in feature file will have a corresponding Java method in a class called *StepDefinitions.java. Name of the class can be anything but the methods should be annotated with @Given or @And or @When or @Then. StepDefinition methods are annotated with @Given/@When/@Then annotations. When a feature file or scenario is run, Cucumber finds the matching step definition method for each step and executes the same.
In a nutshell, if the pattern of the step matches with the value of the @Given/@When/@Then annotation, corresponding method is executed. Hence, there can be only one matching method per step in feature file.
By now, your mind may be thinking that creating one method per step may need a lot of code and it sounds crazy. But, don’t worry there are smart ways to create one step definition method and reuse it for multiple steps using Cucumber Expressions. We will learn how to use Cucumber Expressions in the coming chapters.
8. Create Step Definitions
Let’s create the step definitions file for 1000-sum-of-numbers.feature
Navigate to following location and create class for adding step definition methods,
cd src/test/java/com/madrascoder/cucumberbooksample/stepdefinitions
touch AdditionStepDefinitions.java
Add the following code,
import static org.assertj.core.api.Assertions.assertThat;

import io.cucumber.java.en.And;
import io.cucumber.java.en.Given;
import io.cucumber.java.en.Then;
import io.cucumber.java.en.When;

public class AdditionStepDefinitions {

  private int firstNumber;
  private int secondNumber;
  private int calculatedSum;

  @Given("first number is {int}")
  public void firstNumberIs(int firstNumber) {
    this.firstNumber = firstNumber;
  }

  @And("second number is {int}")
  public void secondNumberIs(int secondNumber) {
    this.secondNumber = secondNumber;
  }

  @When("user executes sum function")
  public void userExecutesSumFunction() {
    calculatedSum = firstNumber + secondNumber;
  }

  @Then("the sum is {int}")
  public void theSumIs(int expectedSum) {
    assertThat(calculatedSum).isEqualTo(expectedSum);
  }
}
Annotations @Given, @And, @When, @Then are synonymous, they can be used interchangeably. Important part is the value of these annotation. These values corresponds to the steps in feature file. You may have noticed {int} in annotation values. We will learn more about expressions {int}, {string} etc., in future chapters. For now, imagine the text at location of {int} in feature file will be automatically converted to int and supplied as argument to the corresponding method.
Compare the steps that starts with Given, When, Then in feature file with the methods in the step definitions class file. This is how the feature file and Java code is connected.
9. Project Structure
If you had done all the steps from the beginning, you may have the following project structure. Take few minutes to compare your project with what is stated below, this way when you run the Cucumber test in next step, it will work as expected.
➜  cucumber-book-sample tree
.
├── HELP.md
├── cucumber-book-sample.iml
├── mvnw
├── mvnw.cmd
├── pom.xml
└── src
    ├── main
    │   ├── java
    │   │   └── com
    │   │       └── madrascoder
    │   │           └── cucumberbooksample
    │   │               └── CucumberBookSampleApplication.java
    │   └── resources
    │       ├── application.properties
    │       ├── static
    │       └── templates
    └── test
        ├── java
        │   └── com
        │       └── madrascoder
        │           └── cucumberbooksample
        │               ├── CucumberSpringContextConfiguration.java # Added
        │               ├── RunCucumberTest.java                    # Added
        │               └── stepdefinitions                         # Added
        │                   └── AdditionStepDefinitions.java        # Added
        └── resources
            ├── com                                                 # Added
            │   └── madrascoder                                     # Added
            │       └── cucumberbooksample                          # Added
            │           └── 1000-sum-of-numbers.feature             # Added
            └── junit-platform.properties                           # Added
10. Run Cucumber Test
There are multiple ways to trigger/run Cucumber tests, here is the list
You may do mvn verify from your terminal or command prompt as stated below.
cd cucumber-book-sample
mvn clean verify
...

2021-04-12 20:46:51.552  INFO 55910 --- [           main] o.s.b.w.embedded.tomcat.TomcatWebServer  : Tomcat started on port(s): 59841 (http) with context path ''
2021-04-12 20:46:51.560  INFO 55910 --- [           main] c.m.c.CucumberSpringContextConfiguration : Started CucumberSpringContextConfiguration in 3.771 seconds (JVM running for 5.486)

Scenario: Sum of two numbers      # com/madrascoder/cucumberbooksample/1000-hello-world.feature:4
  Given first number is 10        # com.madrascoder.cucumberbooksample.stepdefinitions.AdditionStepDefinitions.firstNumberIs(int)
  And second number is 20         # com.madrascoder.cucumberbooksample.stepdefinitions.AdditionStepDefinitions.secondNumberIs(int)
  When user executes sum function # com.madrascoder.cucumberbooksample.stepdefinitions.AdditionStepDefinitions.userExecutesSumFunction()
  Then the sum is 30              # com.madrascoder.cucumberbooksample.stepdefinitions.AdditionStepDefinitions.theSumIs(int)
[INFO] Tests run: 1, Failures: 0, Errors: 0, Skipped: 0, Time elapsed: 4.666 s - in Addition
...
[OR]
You may right click on RunCucumberTest.java and choose Run/Debug in IntelliJ
[OR]
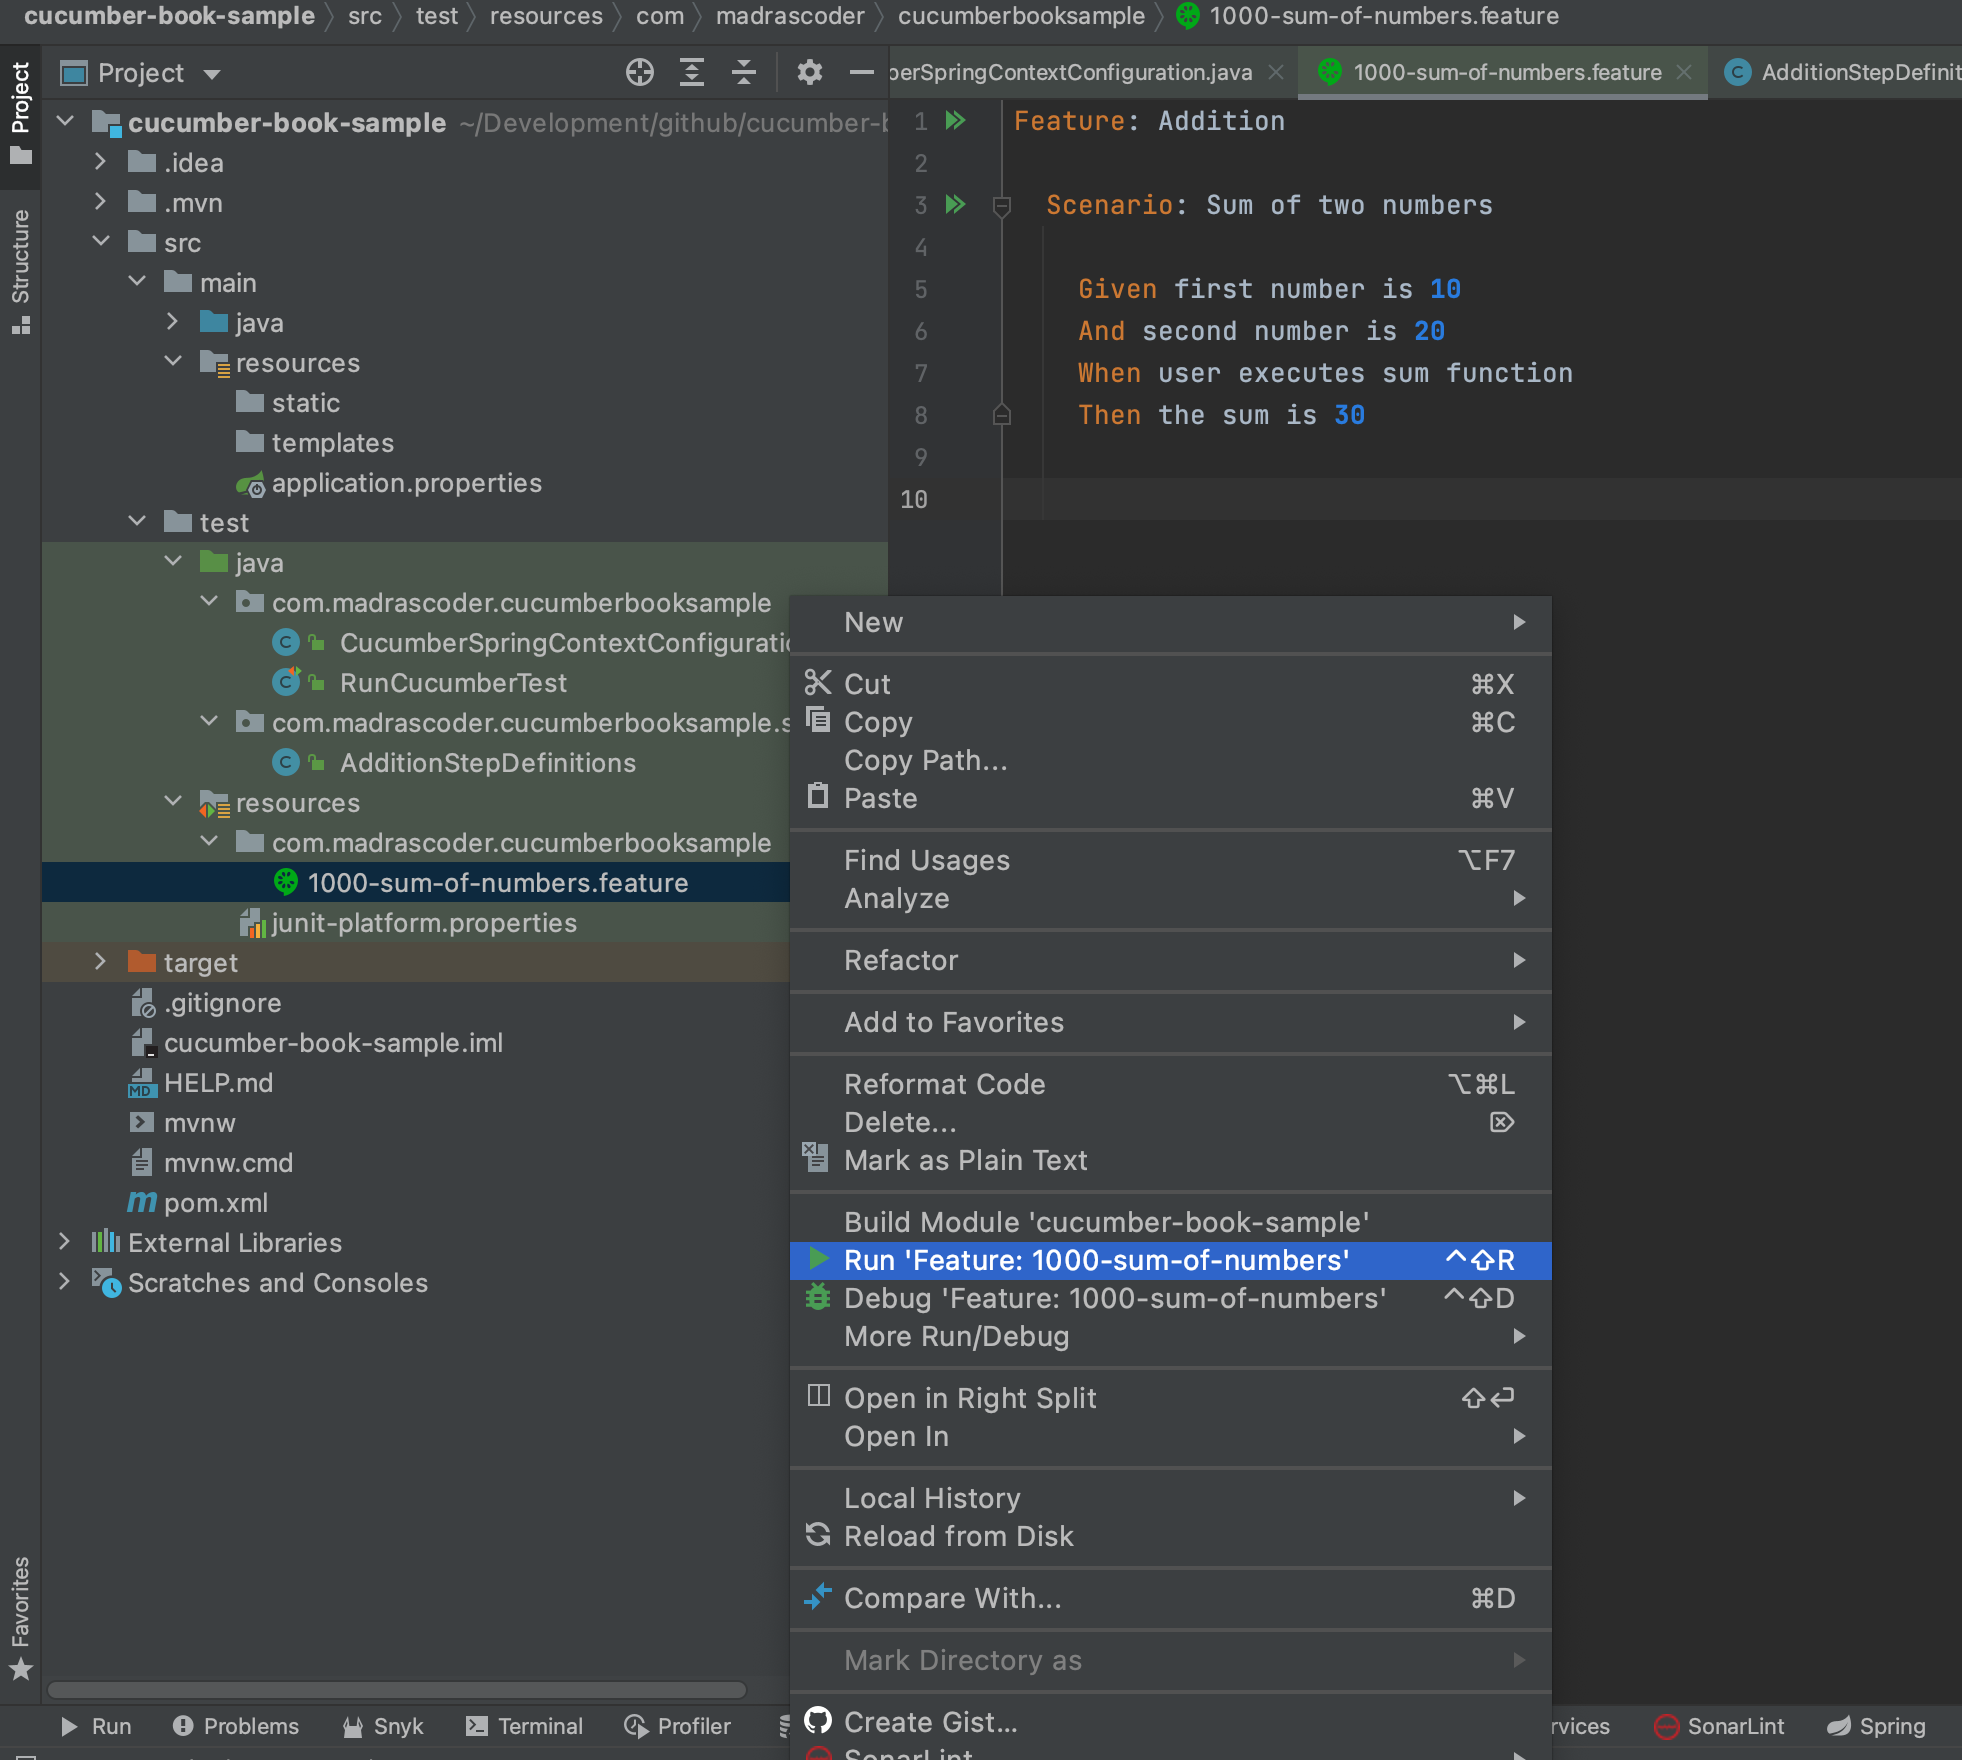
You may right click on 1000-sum-of-numbers.feature under resources and choose Run in IntelliJ
Conclusion
In this chapter, we created a Java, Spring Boot project, added Cucumber dependencies, created necessary configuration to bootstrap Spring Boot Test context configuration, created a class to run Cucumber tests, created feature file, create step definitions and finally run the test using various ways. In the next chapter, we will learn different ways of creating feature files and corresponding step definitions.
References
Credits
Photo by Braden Collum on Unsplash
Previous Chapter | Scroll Up to Top | Table of Contents | Next Chapter